SFM: How to import models, cameras, maps, and attach custom models to players - advancedfx/advancedfx GitHub Wiki
( Tutorial by https://twitter.com/Flatypus )
If you don't know anything about SFM it can be pretty confusing. I've learned a little bit about it, hope this helps!
How to get a CSGO map into SFM:
You need to save the maps you want to use in a way that SFM can understand. SFM doesn't come ready to use CSGO the same way you can just load up any Team Fortress 2 map. You can't just drop your CSGO map's .bsp in. That's like trying to speak French to someone who only speaks Russian. We have to translate - we'll decompile the original .bsp in the CSGO SDK to get a .vmf file, and then put that .vmf file in the Source Filmmaker SDK and compile it into a .bsp.
Luckily you can download the official map .vmf's from 3kliksphilip here:
https://www.youtube.com/watch?v=pw8yiiIlJRU
If it isn't an official map you want to use, you'll have to decompile it using BSPSource https://developer.valvesoftware.com/wiki/BSPSource
Now, to turn 3kliksphilips's .vmf's into a .bsp SFM can read:
Get GCFScape - http://nemesis.thewavelength.net/?p=26
Go into Steam>steamapps>common>Counter-Strike Global Offensive>csgo and open pak01_dir.vpk. Extract ALL THE FILES into the SFM folder. That's Steam>steamapps>common>SourceFilmmaker>game>csgo.
(If you are putting a custom map in SFM instead of an official one, you'll probably need to extract the extra textures etc. into your SFM folder as well.)
Open the SFM SDK through Source Filmmaker (NOT THE CSGO SDK, OR THE MAP WON'T WORK IN SFM), open the Hammer editor, and open the .vmf you want to turn into a .bsp.
File>Run Map and change the settings to Normal and Normal. Make sure HDR is enabled. You can change the settings to Fast and Fast if you don't want to wait but it won't look as good.
When it's done compiling, put the .bsp in SourceFilmmaker>game>csgo>maps.
Go to SourceFilmmaker>game>usermod>gameinfo.txt
Find the bit where it says SearchPaths, add a line that says "Game csgo". Save it.
Now you can open SFM and load in your map.

How to get a POV camera and player animations in SFM:
There are a few different mirv_streams camera options in HLAE. The commands you need to do in CSGO are:
host_timescale 0;
cl_clock_correction 0;
mirv_fix playerAnimState 1;
mirv_streams record agr enabled 1;
If you want you can record a stream as well just to make sure you have the right fov settings and everything lines up:
mirv_streams add baseFx base
Now go the starting point you want. Set the framerate to 30 (anything else is too big for SFM to handle) and record streams.
host_framerate 30;
mirv_streams record start;
///record your clip
mirv_streams record end;
Now you have the .agr you have to import it. SFM uses a plugin to do this. Download it from https://github.com/advancedfx/afx-sfm-scripts
Put the files in Program Files (x86)\Steam\steamapps\common\SourceFilmmaker\game\platform\scripts\sfm\animset
Open Source Filmmaker and load your map.
First thing you need to do is add a camera in the Animation Set Editor. That's on the left part of your screen. Right click>create animation set for new camera
On the timeline drag it back to the start of the clip, this is where the .agr animations are going to start when we import them.
We only need that "camera1" to import the .agr. Right click the camera>rig>advancedfx_import_gamerecord
It will take a little while to load. If this crashes your SFM it means your .agr file is too big (you recorded for too long).
Now it has also imported the .agr pov camera called "afxCam". Go the tab under the preview window where it says Work Camera and press the drop down menu on the right side. Change scene camera>afxCam
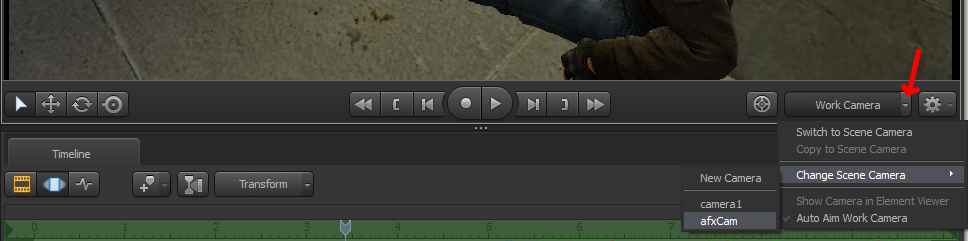
You can click the text where it says afxCam and it will switch between the POV camera and your SFM work camera which you will use to edit things in.
If you want to attach a mask or a chicken or a second head to a playermodel:

Make sure you have the Motion Editor selected so we can edit things in 3D space and time
To import a mask go to the Animation Set Editor and right click>create animation set for new model
Position it where you want it to be attached
In the Animation Set Editor select the model, for example afx.55312387 models/player/custom_player/legacy/tm_leet_variantA.mdl
Press the expand buttons next to the names to see all the body parts (+)
Expand the facemask model and the part that says Unknown
Find the body part you want the mask to be attached to, I want it on the head so click on head_0
drag head_0 to facemask>Unknown>facemask
Now make sure you have the mask selected. Click Playhead and drag your mouse all the way to the right until the grey bar is filled up (#3 on the screenshot).
Now if you scrub through the timeline you'll see the mask model is attached.
So the way CSGO works is you have 2 different types of player models, the player model and the ragdoll (dead model). We need to put the mask on the dead player model too, otherwise it will just float in the air when the player dies.
Scroll down the Animation Set Editor and look for the ragdoll model. To keep things easy drag the ragdoll up and put it underneath the player model.
If you right click you can rename them variantE_alive and variantE_dead, etc. We have to switch the locks from the alive model to the dead model.
Go to the very last frame where the playermodel is used instead of the ragdoll model. you can go frame by frame with the left and right arrow keys.
select facemask>unknown and right click>unlock transforms
Now go to the next frame, which should be the first frame of the ragdoll
The mask wont be in the right place now but we'll fix that in a minute
First we need to use the Motion Editor. You'll notice that it's all green, this is because the whole clip is selected.

So you should still be on the first frame of the ragdoll, go to the far left of the Motion Editor and drag the green over to the right so only the part with the ragdoll is selected. You can zoom in with the scroll wheel to make sure you have the correct frame.
Now do the same thing as before, get the mask locked to the dead model (head_0 dragged to facemask, select unknown, drag playhead right)
It's safe to reposition the mask now. make sure you have mask>unknown selected and rotate/move the model until it's where it should be.
You did it!
Exporting/Rendering: (WIP)
I'm not really sure what the best render settings for SFM are, but if you right click on the preview window you can access them. You should turn off Motion Blur and turn on Ambient Occlusion.
Also open the Element Viewer (it's next to the Animation Set Editor) and expand the session>settings>renderSettings and movieSettings. You can change your frame rate and size dimensions there.
For some reason in Steam I have my launch options for SFM as "-sfm_resolution 1080". I think it's because SFM won't render in 1080p otherwise, but I have no idea lol.
If you know anything about rendering in SFM or have any suggestions for this guide let me know!