Quick Start Guide - acquia/reservoir GitHub Wiki
Repositories
Composer-supported profile
https://github.com/acquia/reservoir
Composer based starting project
https://github.com/acquia/reservoir-project
Acquia BLT configured projects
Existing (fork or try yourself)
https://github.com/damontgomery/well (Reservoir, BLT, Drupal VM)
https://github.com/ba66e77/mrpink (Reservoir, BLT, Drupal VM)
Create your own
https://www.datasmith.net/article/setting-blt-reservoir
Installation notes
Setting up OAuth keys
The web based installer will create temporary keys, but it's likely your system will delete these. To be safe, you can create your own keys.
Let's assume your project is within /docroot like,
.git
.gitignore
docroot
docroot/core
docroot/modules
docs
...
Follow this process to create and configure your own keys. This is based on the README in the simple_oauth module used by Reservoir.
# Create a folder for your keys.
mkdir oauth

# Open that folder.
cd oauth

# Create your private key.
openssl genrsa -out private.key 2048

# Create your public key.
openssl rsa -in private.key -pubout > public.key
You will need to visit /admin/config/people/simple_oauth to set your keys.
# The paths provided must be full paths.
# The following example uses defaults from Drupal VM as seen with Well.
public key: /var/www/[site]/oauth/public.key
private key: /var/www/[site]/oauth/private.key

# Example
public key: /var/www/well/oauth/public.key
private key: /var/www/well/oauth/private.key
While you are here, you might want to increase the expiration time to 1 hour for the access token. 3600 seconds is 1 hour.
Setting up roles and clients
When accessing the site from outside Drupal, a user accesses the API using a client. That client has a defined scope of permissions which defines what they can view and modify.
Create a new role
/admin/access/roles
Scopes and managed as roles in Reservoir. This is a set of permissions that a client / user has for creating, viewing, deleting, updating, etc content.
Assign this role permissions (RECOMMENDED)
/admin/access/permissions
Roles are not worth much without permissions. Allow the new role to create, delete, etc content.
Create a new client
/admin/access/oauth2/clients
Now that you have a role, you can create a new client. This client will pair to your application and allow users to log in through that client.
Assign this client a scope
When creating a client, you will see scopes based on the roles you created earlier.
Create a new user (RECOMMENDED)
/admin/access/users
Create a new user and assign that use to the role you created before. We will use this user to get an authentication token.
Testing the system with Postman
Postman is a free tool for testing requests and responses. You can download it from the Google Chrome store. This should get you started. For more information, please see the list of guides, https://github.com/acquia/reservoir/wiki/Guides-and-Resources.
Authentication
Set an expiration for authentication keys
You will probably want to increase the expiration time for the key so that testing is easier.
Go to /admin/config/people/simple_oauth and set the expiration to something longer. 3600 = 1 hour.
Get an authentication token
Create a new POST request for http://local.well.com/oauth/token.
With the Body tab, select x-www-form-urlencoded.
Add key / values for
grant_type: password
client_id: (get from /admin/access/oauth2/clients)
client_secret: (used when creating the client)
username: (Drupal user)
password: (Drupal user's password)
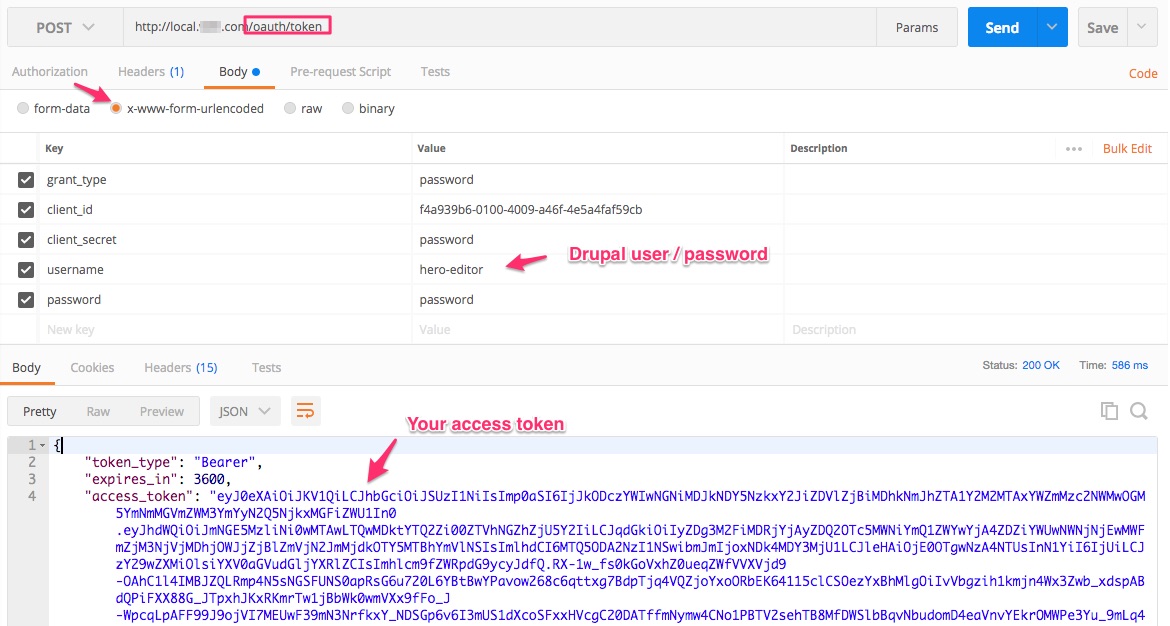
When you Send the request, you will get back an access token.
API generated documentation
Reservoir will generate documentation for the API for each site. Visit /admin/api
Get a list of articles
No authentication is required.
Make a GET request to /jsonapi/node/article
You can view the response as JSON.
Create an article
Authentication is required. Make sure your client has the permissions to create articles.
Make a POST request to /jsonapi/node/article.
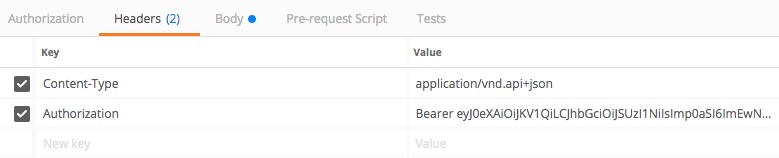
Add these two headers:
Content-Type: application/vnd.api+json
Authorization: Bearer (insert your access_token from the token request before)
In the body of the request, you can provide a JSON formatted data object with your new article.
Create (POST) request body
{
  "data": {
    "attributes": {
      "langcode": "en",
      "status": true,
      "title": "Mr Postman",
      "field_body": null
    }
  }
}
This example creates a new article with the title Mr Postman and no body.
Send the request and get back the data for that new article.
Delete an article
Authorization is required. See the Create an article section for headers.
Create a DELETE request using the UUID of the article and the path /jsonapi/node/article/(UUID)
Update an article
Authorization is required. See the Create an article section for headers.
Create a PATCH request using the UUID of the article and the path /jsonapi/node/article/(UUID)
The body then provides the ID again along with any information that should change. The response includes that node back,
Update (PATCH) request body
{
  "data": {
    "id": "141962d7-2180-4419-bb8e-a9c1d337aeb2",
    "attributes": {
      "title": "Mr Patchy"
    }
  }
}
Getting ready for decoupled frontend development
Configure CORS settings
Drupal core supports a system for configuring CORS settings. These are necessary if your browser based application will be running with a different origin than the Reservoir site.
You can find the settings in sites/default/default.services.yml under CORS
parameters:
   # Configure Cross-Site HTTP requests (CORS).
   # Read https://developer.mozilla.org/en-US/docs/Web/HTTP/Access_control_CORS
   # for more information about the topic in general.
   # Note: By default the configuration is disabled.
  cors.config:
    enabled: false
    # Specify allowed headers, like 'x-allowed-header'.
    allowedHeaders: []
    # Specify allowed request methods, specify ['*'] to allow all possible ones.
    allowedMethods: []
    # Configure requests allowed from specific origins.
    allowedOrigins: ['*']
    # Sets the Access-Control-Expose-Headers header.
    exposedHeaders: false
    # Sets the Access-Control-Max-Age header.
    maxAge: false
    # Sets the Access-Control-Allow-Credentials header.
    supportsCredentials: false
In Drupal 8, you can override these settings in two ways.
Configure the site on all environments
Edit sites/default/services.yml and update the values for CORS. You will want to enable the system and then provide your own parameters.
Example
parameters:
  cors.config:
    enabled: true
    # Allow 'Content-Type' and 'Authorization' headers.
    allowedHeaders: ['content-type', 'authorization']
    # Allow GET, POST, PATCH, DELETE, OPTIONS, etc..
    allowedMethods: ['*']
    # Allow access from a local web server running on port 3000.
    allowedOrigins: ['http://localhost:3000']
Rebuild the cache to rebuild the system, example: drush cr
Configure the site on just your local setup
Edit sites/default/development.services.yml and add the values for CORS. See the example above.
Rebuild the cache to rebuild the system, example: drush cr