xchip lab 3 - VCSFA-MARS/ThinSat-Program GitHub Wiki
To perform this lab you will need:
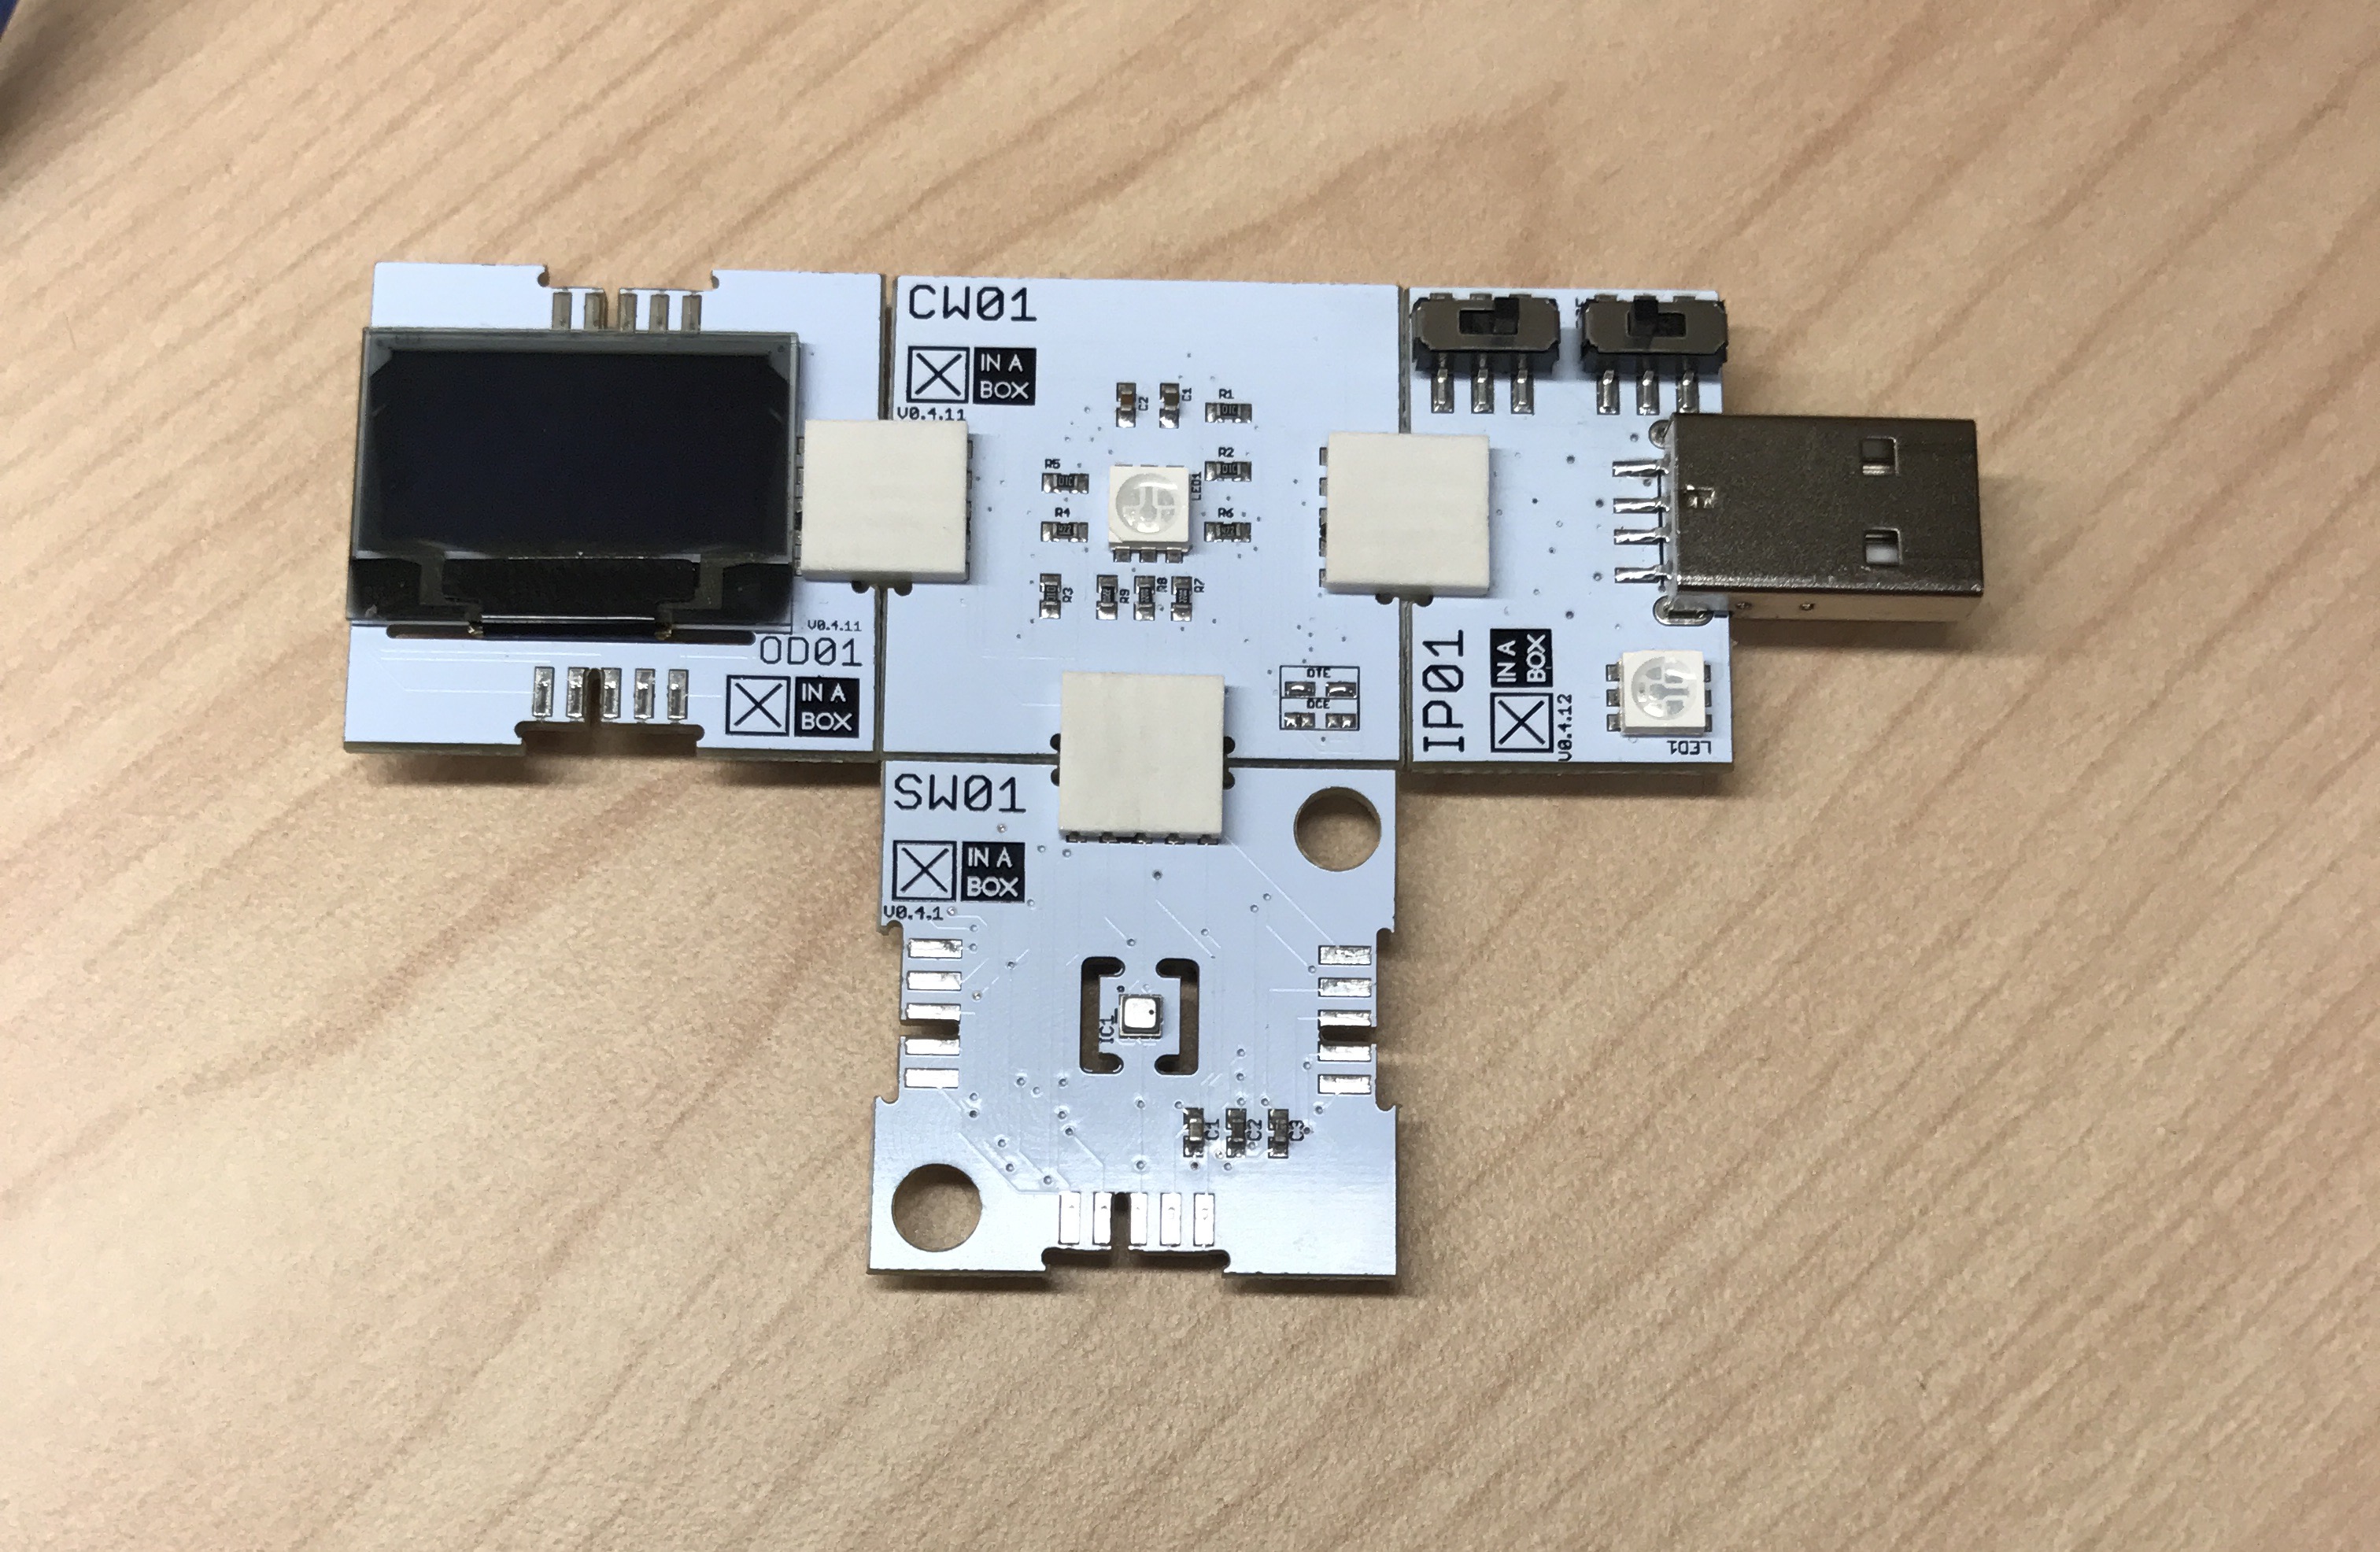
- IP01 xChip- USB module
- CW01 xChip- WiFi module and processor
- OD01 xChip- OLED display module
- SW01 xChip- Humidity, Pressure, and Temperature Sensor
- 3 Connector pieces
Click your pieces together using the connector pieces. Again, the xChips can be plugged together in any configuration, and the xSystem will work no matter the configuration. Compared to Lab 2, we will simply be replacing the SL01 with the SW01 xChip.
Our SW01 xChip has many different capabilities--it can measure temperature, humidity, altitude and pressure. In the first lab we will take a pressure measurement and altitude calculation.
The SW01 can tell us the air pressure from a range of 30000 to 110000 Pascals (Pa).
Air pressure is directly related to altitude. Air pressure decreases as altitude increases, and our sensor can use its own pressure reading to calculate altitude. Altitude is measured in meters above sea level.

Let's begin by measuring and displaying pressure. Copy and paste the code from below into your Arduino IDE. Verify and upload the program onto your xSystem.
NOTE: Your IP01 USB module has two switches. Be sure they are set to "B" and "DCE." The xChip will not be able to receive code if it is in any other configuration.
//////////////////////////////////////////////////////////////
// This code reads Pressure and displays the data on the OLED
// Written by J. Singh
//////////////////////////////////////////////////////////////

#include <xCore.h>                //This library allows us to use the CW01 processor
#include <xOD01.h>                //This library allows us to use the OD01 screen
#include <xSW01.h>                //This library allows us to use the weather sensor

void setup() {
  // This setup code will prepare our xSystem for use. It will only run once.

  Wire.begin(2,14);               //Start I2C communication with the xSystem
  OLED.begin();                   //Turn on the OLED Screen
  SW01.begin();                   //Turn on the SW01 sensor

  OD01.set2X();                   //Set the font size to big
  OD01.println("===========");
  OD01.println(" Pressure  ");    //Print opening message on OLED Screen
  OD01.println("===========");

  delay(5000);                    //Give SW01 sensor five seconds to normalize before starting loop

}

void loop() {
  // This is the body of the code. It will repeat indefinitely.

  OD01.clear();                   //Clear the OLED display

  SW01.poll();                    //Tell the SW01 sensor to read and store data

  OD01.println("Pressure:");
  OD01.print(SW01.getPressure()); //display the pressure on the OLED screen
  OD01.println(" Pa");

  delay(2000);                    //pause for two seconds before displaying new reading
}
Just like in Lab 2, you will see the "Title Screen" display for five seconds, and then the real-time pressure reading will print to the OLED screen repeatedly.
There is a problem with the display: the "Pa" following our pressure number is cut off. How can we fix this problem?

We want to keep the pressure value and the unit on the same line, and we want to keep the space between the number and the unit so that it is easy to read. In this case, a good solution would be to change our units.
The goal is to reduce the amount of room on the screen our pressure value takes up. 1 hPa (hectoPascal) is equal to 100 Pa (Pascal), so converting our reading to an hPa value will make it a more compact number, with the same value.
This is like converting feet to miles. 1 mile is a smaller number than 5280 feet even though they are the same distance.
Try making this unit conversion of "Pa" to "hPa" by dividing the pressure by 100. Don't forget to change your unit display to "hPa". The void loop(){} in your code should now look something like this:
void loop() {
  // This is the body of the code. It will repeat indefinitely.

  OD01.clear();                   //Clear the OLED display

  SW01.poll();                    //Tell the SW01 sensor to read and store data
  OD01.println("Pressure:");
  OD01.print(SW01.getPressure()/100);  //display the pressure on the OLED screen
  OD01.println(" hPa");

  delay(2000);                    //pause for two seconds before displaying new reading
}
Verify the code and remedy any errors before uploading to your xSystem. The display should fit on the screen now.
FUN FACT: Standard air pressure at sea level is 1013.25 hPa. How close to that number is your pressure value?
Pressure shouldn't vary by much on your xSystem because air pressure is relatively constant.
Awesome! We can now read our air pressure, so let's try reading something else--altitude. Go ahead and replace your entire code with the following:
/////////////////////////////////////////////////////
// This code displays altitude on the OLED screen
// Written by E. Bujold
/////////////////////////////////////////////////////

#include <xCore.h>    //This library allows us to use the CW01 processor
#include <xOD01.h>    //This library allows us to use the OD01 screen
#include <xSW01.h>    //This library allows us to use the weather sensor

void setup() {
  // This setup code will prepare our xSystem for use. It will only run once.

  Wire.begin(2,14);               //Start I2C communication with the xSystem
  OLED.begin();                   //Turn on the OLED Screen
  SW01.begin();                   //Turn on the SW01 sensor

  OD01.set2X();
  OD01.println("===========");
  OD01.println(" Altitude  ");    //Print opening message on OLED Screen
  OD01.println("===========");

  delay(5000);                    //Allow SW01 sensor to normalize before starting loop
}

void loop() {
  // This is the body of the code. It will repeat indefinitely.

int count = 1; //Declare counting variable, used in 'for loop'

OD01.clear();               //Refresh display
OD01.set2X();               //Set font size
OD01.println("Altitude:");  //Print header on LED

//Display Altitude
  for (count = 1; count < 6; count++){
    //'For Loop', if count is less than 6, run the loop, then add 1 to count
    OD01.set1X();                     //Set font size
    SW01.poll();                      //Get sensor reading
    OD01.print(SW01.getAltitude());   //Display sensor reading
    OD01.println(" m");               //Print units
    delay(2000);                      //Pause for two seconds then repeat
  }

}
Verify the code and remedy any errors before uploading to your xSystem. We should now have our OLED displaying how many meters above sea level it believes it is.
This value is derived which means it bases its value on that of another. In this case altitude is derived from pressure, and when pressure is increased, altitude will decrease. Read the Deeper Understanding section at the end of this lab to learn more!
To prove that the altitude is just calculated from the pressure sensor, let's try something fun. Blow air onto the SW01 xChip and see what happens on the display. The altitude changes dramatically even though the xSystem didn't move up or down. The increased air pressure from you blowing on the sensor was enough to alter the calculation.
Another cool part of this code is the use of a "for loop". A "for loop" is another kind of logic statement that is used to repeat a set of instructions a specific number of times. In the code, the loop is used to print six new readings to the OLED before pausing and clearing the display. The use of this loop is covered in Deeper Understanding as well.
What if we want our OLED to display altitude and pressure simultaneously? Try to think of how you would change your code to do this before moving on.
Replace your entire code with the following. Verify the code and remedy any errors before uploading to your xSystem.
//////////////////////////////////////////////
// This code displays Pressure and Altitude
// Written by J. Singh
/////////////////////////////////////////////

#include <xCore.h>                //This library allows us to use the CW01 processor
#include <xOD01.h>                //This library allows us to use the OD01 screen
#include <xSW01.h>                //This library allows us to use the weather sensor

void setup() {
// This setup code will prepare our xSystem for use. It will only run once.

  Wire.begin(2,14);               //Start I2C communication with the xSystem
  OLED.begin();                   //Turn on the OLED Screen
  SW01.begin();                   //Turn on the SW01 sensor

  OD01.set2X();
  OD01.println("===========");
  OD01.println("  Weather  ");    //Print opening message on OLED Screen
  OD01.println("===========");

  delay(5000);                    //Allow SW01 sensor to normalize before starting loop
}

void loop() {
// This is the body of the code. It will repeat indefinitely.
  OD01.clear();             //Clear display
  OD01.set2X();             //Set font size
  OD01.println("Weather");  //Display 'Weather' title

//Display Pressure
  OD01.set1X();                        //Set font size
  SW01.poll();                         //Tell the SW01 sensor to read and store data
  OD01.println("Pressure:");
  OD01.print(SW01.getPressure()/100);  //Display the pressure on the OLED screen
  OD01.println(" hPa");
  OD01.println();

//Display Altitude
  OD01.println("Altitude:");
  OD01.print(SW01.getAltitude()); //Display the altitude on the OLED screen
  OD01.println(" m above the sea");

  delay(5000);                    //Pause for five seconds

}
Nice! Our OLED should now be simultaneously displaying pressure and altitude.
Continue to Lab 4!
A key component of programming in any coding language is the use of conditional loops. Conditional loops are pieces of code that execute based on a condition. These pieces of code are very useful to us when making repetitive calculations or controlling a system. Let's look at the "for" loop, one of the most common conditional loops in programming.
In our second program for altitude, we used this 'for loop':
for (count = 1; count < 6; count++ ) {Do these instructions}
- The program uses a variable that we call a counter, it is a very important piece in the 'for loop' structure. You can set an initial value here as well,
count = 1. This is only done once. - The counter is compared to a True/False logic statement, such as
count < 6, if the statement is true, then the loop will be performed. - At the end of the loop, we will add 1 to the counter using a shorthand code
count++. After 1 is added to the counter, the loop will reevaluatecountagainst the logic statement in step 2. - Steps 2 and 3 are repeated until the logic statement is false. When that happens the code will 'break from the loop' and perform the next step outside the 'for loop'
An altimeter is any device that can measure height above a reference point (sea level is the common reference for measuring altitude). That means that the SW01 xChip is technically an altimeter. The most common means by which altimeters calculate altitude is pressure measurement, although some actually use GPS, sonar, or radar. For the pressure measurement method, an altimeter is usually calibrated in the following way:
Altitude = C * T * log(Sea Level Pressure/Current Pressure)
In this equation, C is a calibration constant, T is absolute temperature, and log is the log base 10 function.
If we want to see exactly how the SW01 gives us our values, we can look into the SW01 library. A library is essentially a set of code that tells our program exactly how to execute shortcut functions such as getAltitude(). We will learn more about libraries in later labs.
float xSW01::getAltitude(void){
	float atmospheric = pressure / 100.0F;
	altitude = 44330.0 * (1.0 - pow(atmospheric / 1013.25, 0.1903));
    return altitude;
The code above is what our SL01 xChip uses to give us meters above sea level.
Home | Getting Started | Code Tutorials | Troubleshooting | xChip Glossary
For technical support please email: [email protected]
![]()