Setup Mode
Setup mode is used to configure the device and you can perform the following, depending of running firmware and setup web color:
- Add Extra Pairing
- Remove All Extra Pairings
- Reset HomeKit ID
- Reset Settings
- Remove WiFi Settings
- Installer Setup
- Firmware Update
- Auto OTA Updates
- WiFi AP
- WiFi AP Password
- WiFi Mode
- Current
- Flash
- IR/RF Capture GPIO
- Change WiFi Network
- Input / Edit MEPLHAA script
- Update Server
Once Save button is pressed, device will boot with current firmware in normal mode, resuming operations. This mean that if setup was from HAA Installer, device will start the update process.
NOTE: If an invalid MEPLHAA script or no script is detected during boot, the device will enter setup mode automatically.
NOTE: "⟲ WiFi Networks" will reload web page and search for & show a list of networks discoverable by your device
HAA uses 3 different firmwares with 3 different setups. Each firmware has specific functions:
| Firmware | Setup Color | Description |
|---|---|---|
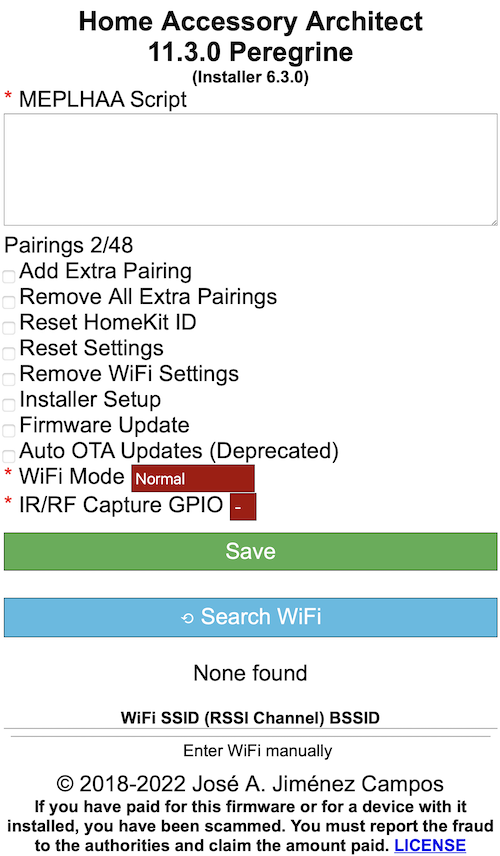
| HAA MAIN | White | Main firmware with HomeKit capabilities |
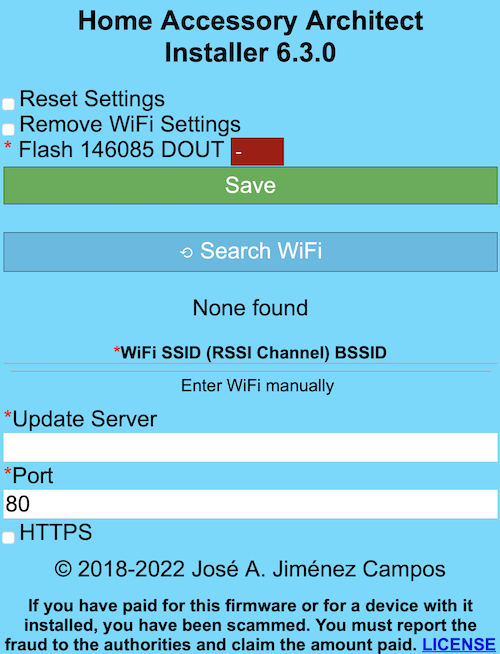
| OTA MAIN | Blue | Installer of HAA MAIN and HAA BOOT |
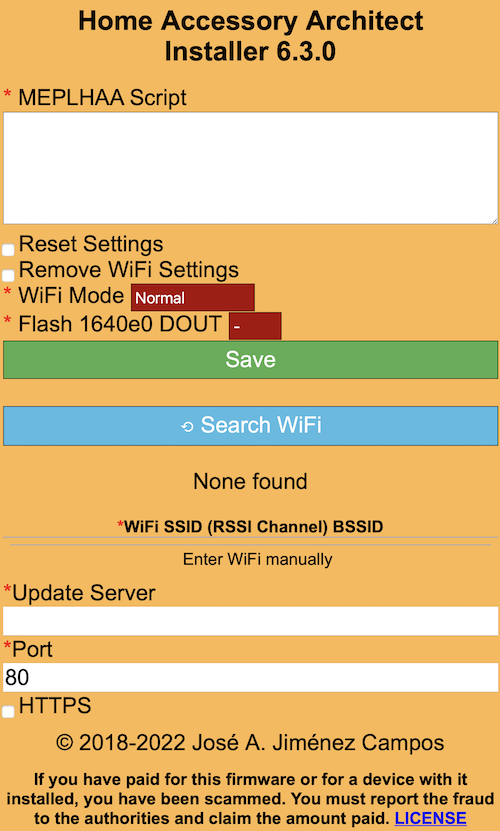
| HAA BOOT | Orange | Installer of OTA MAIN |
Different setup pages are:
To enter setup mode, there are different ways:
-
HAA Home Manager App: from the Setup Service of the HAA device, toggling Setup; but this way needs the device added to Apple Home.
-
Service physical controls or from Apple Home App: you must quickly toggle any action switch/button 8 times. You can change the number of needed toggles or disable this way by declaring a different value. You can secure this method by declaring a time after device boot to perform it.
-
Physical controls from script config section: Additionally, you can declare a physical method to enter setup mode. You can secure this method by declaring a time after device boot to perform it.
-
System action "1": You can declare a system action to enter setup mode in any HAA service. You can secure this method by declaring a time after device boot to perform it.
-
Emergency Setup Mode: If a device has its power cut or freezes within 2 seconds of boot, next time it boots, it will go directly to setup mode. This method is always available and is independent from script or Apple Home.
If the device's configured WiFi network is unavailable and WiFi AP is enabled, when entering setup mode
it will switch to AP mode if it is enabled and you will need to connect directly to it via the
generated SSID e.g. HAA-XXXXXX (where XXXXXX are the last six characters of
its Ethernet MAC address), and then open URL in a web browser:
http://192.168.4.1:4567If a device has been through initial configuration and is already configured for
a WiFi network then once it has entered setup mode it can be accessed using a
web browser by connecting to its IP address or HAA auto-configured hostname
e.g. http://192.168.1.45:4567 or http://HAA-123BC7:4567 (Note: some routers may
require you to use the .local domain http://HAA-123CB7.local:4567 or if you have
set your local domain then use this instead).
If you load setup web page, device will restart automatically after 15 minutes (or try to update if auto OTA updates is enabled).
There is a flash storage settings integrity that will force to enter setup mode at boot if it is corrupted. A warning will be displayed in setup web page.
The setup mode page presents a list of WiFi networks within range of the device.
The list can be refreshed by clicking the ⟲ WiFi Networks button. If you want
to change the network the device currently connects to on boot then select one
of the available networks and enter the network password when requested.
If your SSID is hidden then you can enter its details manually by clicking on the
Enter SSID manually button. You will then be prompted to enter an SSID and a
password. Make sure you enter both correctly.
If you change WiFi Network, HAA WiFi AP will be enabled automatically, and its password will be removed.
This option applies only for Setup Mode from HAA Main (White background). For others, WiFi AP can not be disabled.
Enables or disables HAA WiFi Access Point when device is in setup mode.
If device is in setup mode, and it connects to network, HAA WiFi AP will be turned off for security. If you want to keep it enabled, you must set a password.
This option applies only for Setup Mode from HAA Main (White background). For others, WiFi AP can not have a password.
Set a password to protect HAA WiFi AP. To remove it, disable WiFi AP.
When a password is defined, HAA WiFi AP will not be disabled when device connects to network.
Depending of your network, you can select a WiFi mode connection:
- Normal: Device will connect to first available SSID found.
- Forced BSSID: Device will connect only to configured SSID and BSSID, ignoring other BSSIDs with same SSID.
Roaming modes: These are useful when Wifi network has several APs with same SSID, or network is a Wifi system without roaming support (802.11v, 802.11r, 802.11k...):
- Passive roaming: device will scan for Wifi networks at boot connecting to BSSID with best RSSI; and when it disconnects, it will search and connect to BSSID with best RSSI.
- Active roaming: same as Passive roaming; and every 35 minutes, device will scan for Wifi networks and it will reconnect to BSSID with best RSSI when it is connected to other. HAA will be unresponsive over Wifi about 2 seconds when it is performing a Wifi networks scan.
- Roaming at boot: device will scan for Wifi networks at boot connecting to BSSID with best RSSI; and when it disconnects, it will connect only to BSSID that found at boot.
If you change WiFi Mode, HAA WiFi AP will be enabled automatically, and its password will be removed.
If the WiFi network becomes unreachable, the device will continually retry its connection until it becomes available again.
This shows current SSID and BSSID configured on device. If there is not any WiFi network configured, it will show NONE.
Device configuration is set by inputting a MEPLHAA script into the Setup Mode page. See the section on Configuration for details on how to create the script.
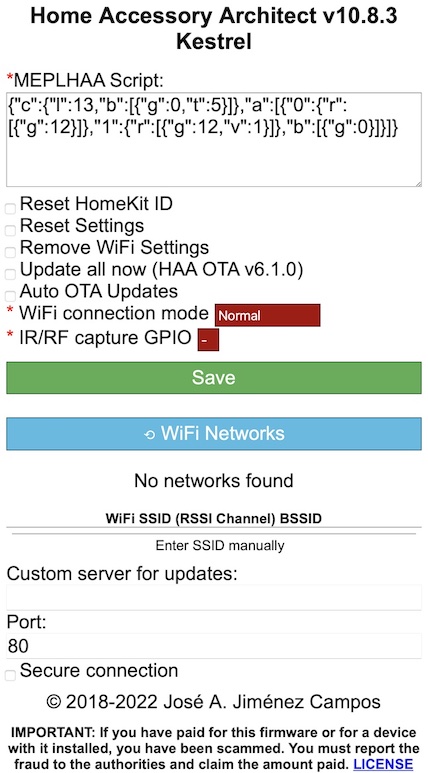
The above image shows Setup Mode with a MEPLHAA script entered and ready
for Save to be pressed.
Information about number of users that have been paired with device using HomeKit.
When device is paired with HomeKit, enabling this option will allow to pair device again with other HomeKit user or controller, like Home Assistant. Device will can be managed by all paired controllers. When extra pairing is used for the first time, a reboot is needed to avoid undesired pairs removed.
This will remove all paired users and controllers added after initial pairing.
When you make edits to your MEPLHAA script that involve changes to the accessory type or number of used accessories you will have to remove & re-add your device from HomeKit and the Home App.
Setting this option will reset the HomeKit ID and all pairings used by the device when you press Save.
When making changes to a device that requires the HomeKit ID to be reset follow this procedure:
- Enter Setup Mode on the device
- Remove your device from the Home App
- Select
Reset HomeKit ID - Select
Save - Pair the device with your Home App again
You can remove all current settings and reformat the flash area where settings are
stored by enabling the Reset Settings option and clicking Save.
This option is useful if you are experiencing problems with upgrading TUYA or
Mongoose installations.
HomeKit ID and pairings will not be removed.
Follow these steps to reset settings keeping current configuration:
- Enter in setup mode web.
- Copy and save current MEPLHAA Script in a safe place.
- Erase MEPLHAA Script field and leave it blank.
- Enable
Reset Settings. - Click on
Savebutton. - Connect to generated HAA WiFi AP.
- Enter in setup mode web at http://192.168.4.1:4567
- Configure WiFi network.
- Put your same saved MEPLHAA cript.
- Click on
Savebutton.
You can remove any currently saved WiFi settings by enabling the
Remove WiFi Settings option and then clicking Save.
The device will remove any previously stored SSID and password then reboot.
As no WiFi settings will be available on reboot the device will immediately
enter Setup Mode.
Enabling this option, device will boot with Installer firmware OTA MAIN in setup mode, allowing to modify options of Blue Setup.
A manual request for an OTA update can be performed by enabling this option and then clicking Save.
The device will then boot with HAA Installer firmware and will check the configured OTA repository for an updated firmware,
download it if available and then restart.
DEPRECATED and REMOVED in HAA v11.3.0
Enabling the Auto OTA Updates option causes the firmware to search for an OTA
update from the configured OTA repository every time the setup mode is selected and
the setup webpage has not been loaded in a browser within 90 seconds.
If setup web page is loaded, device will restart automatically after 15 minutes, or try to update if auto OTA updates is enabled.
This option shows the flash chip ID and the current flash mode used by ESP chip to communicate with flash chip.
You can read about different modes here: Espressif SPI Flash Modes
To change SPI flash mode, you must use setup mode from any HAA Installer (OTA MAIN or HAA BOOT).
IMPORTANT: If you select an unsupported mode, device will be bricked and it will need to be flashed again with wires.
Check out SPI Flash Modes Database to see if your device and flash ID is listed.
| Flash Mode |
|---|
| QIO |
| QOUT |
| DIO |
| DOUT (Default) |
When you want to capture IR codes, you can select here which GPIO has IR/RF receiver connected. Device will reboot and launch IR/RF Capture Tool. You can see result of captures using UART0 connection or network logs. When you finish, reboot device and it will run HAA normal mode.
By default a device flashed with the OTA version of HAA will retrieve its firmware updates from the RavenSystem/haa GitHub account.
Since HAA Installer v3.0.0 the option has been available for the device to retrieve its firmware files from a web server of your choice (local or remote) instead of using the GitHub server.
In order to use your own web server the Custom server for updates and Port
fields need to be filled in with details of the URL to retrieve the files from.
You also have the option of selecting a secure connection.
When using Firmware Update, the device will attempt to retrieve its firmware updates from the Update Server if specified or GitHub if these fields are left blank.
Firmware can also be downgraded by placing an older copy of the files on your web server.
NOTE: Since HAABoot v3.0.0 the firmware files must be signed and verified with a hardcoded public key.
Clicking Save will save any changes you have made while in setup mode,
apply them and reboot the device to use them. All saved states will be removed, and WiFi stack will be cleaned.