Deployment Guide - OfficeDev/microsoft-teams-app-get-support GitHub Wiki
Deployment instructions
Prerequisites
To begin you will need:
- Power Apps Studio
- Power Automate
- A valid SharePoint Online license and permission to create lists and store data
- Power BI Desktop
- A copy of the Get Support App zip package
Package Contents
Table below lists the zip packages under /Deployment folder required during application set up:
| Component | Filename | Description |
|---|---|---|
| SharePoint List creation flow | Flow/DeploySharePointList.zip.zip | Creates the list necessary to hold the data in the app. |
| Get Support Application | App/GetSupport.zip | Allows users to request emergency assistance from supervisors. |
| Get Support Analytics Dashboard | Power BI/Get Support Analytics.pbix | Dashboard to analyze escalations. |
Step 1: Create SharePoint site
-
Sign in to https://www.office.com/, and then select SharePoint on the left navigation bar.
-
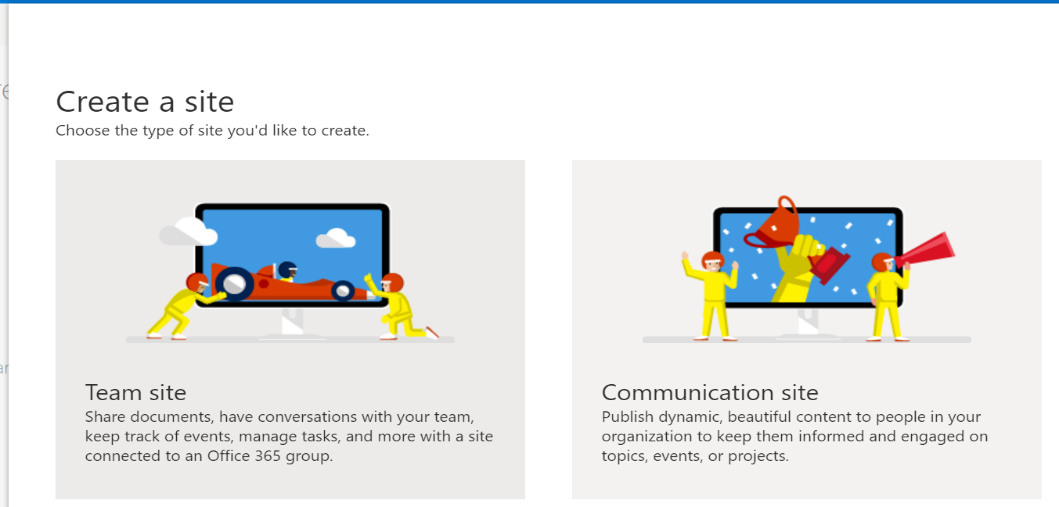
After navigating to SharePoint, select Create site.

- Select Team site.
- Enter name and description for your site.
- Set Privacy settings to Public so that everyone in the company can get the necessary information.

- Select Next.
- Add additional owners for the site (optional).
- Select Finish.
Step 2: Create SharePoint list
The app uses a list to store its data. You can use the DeploySharePointlist Power Automate, available from the downloaded package inside Flows folder, to automatically create the list. The Power Automate creates the required list and fields.
Import the SharePoint List deployment flow
- Go to https://flow.microsoft.com.
- Select My flows from the left navigation pane.
- Select Import on the command bar.
- Upload DeploySharePointList.zip package.
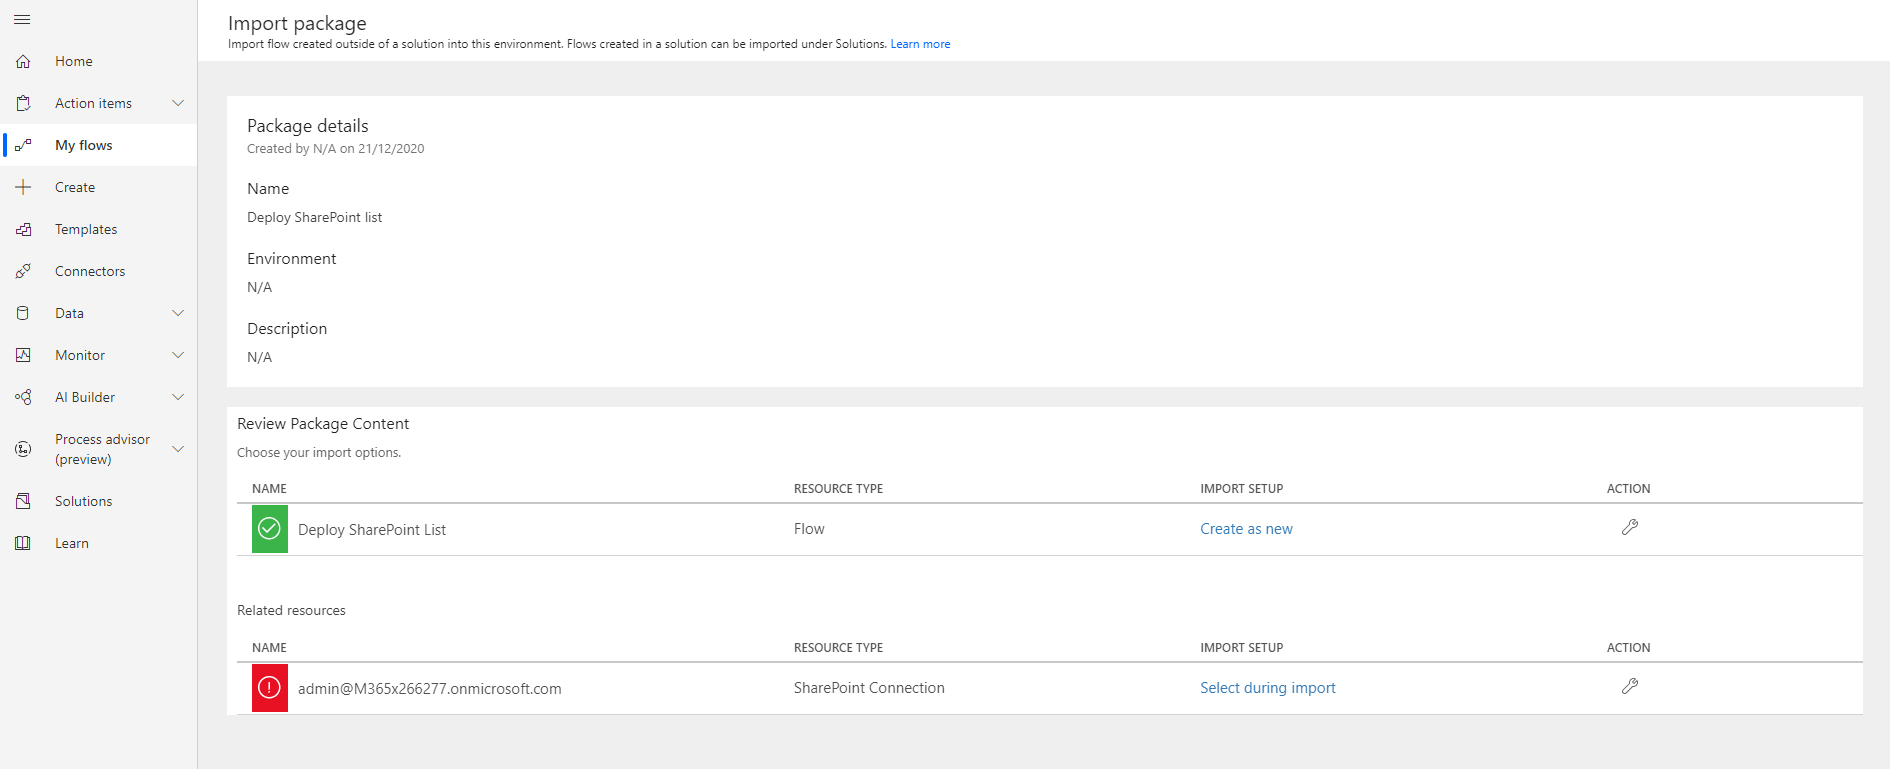
- Under Related resources, add a SharePoint connection by selecting the Select during import link
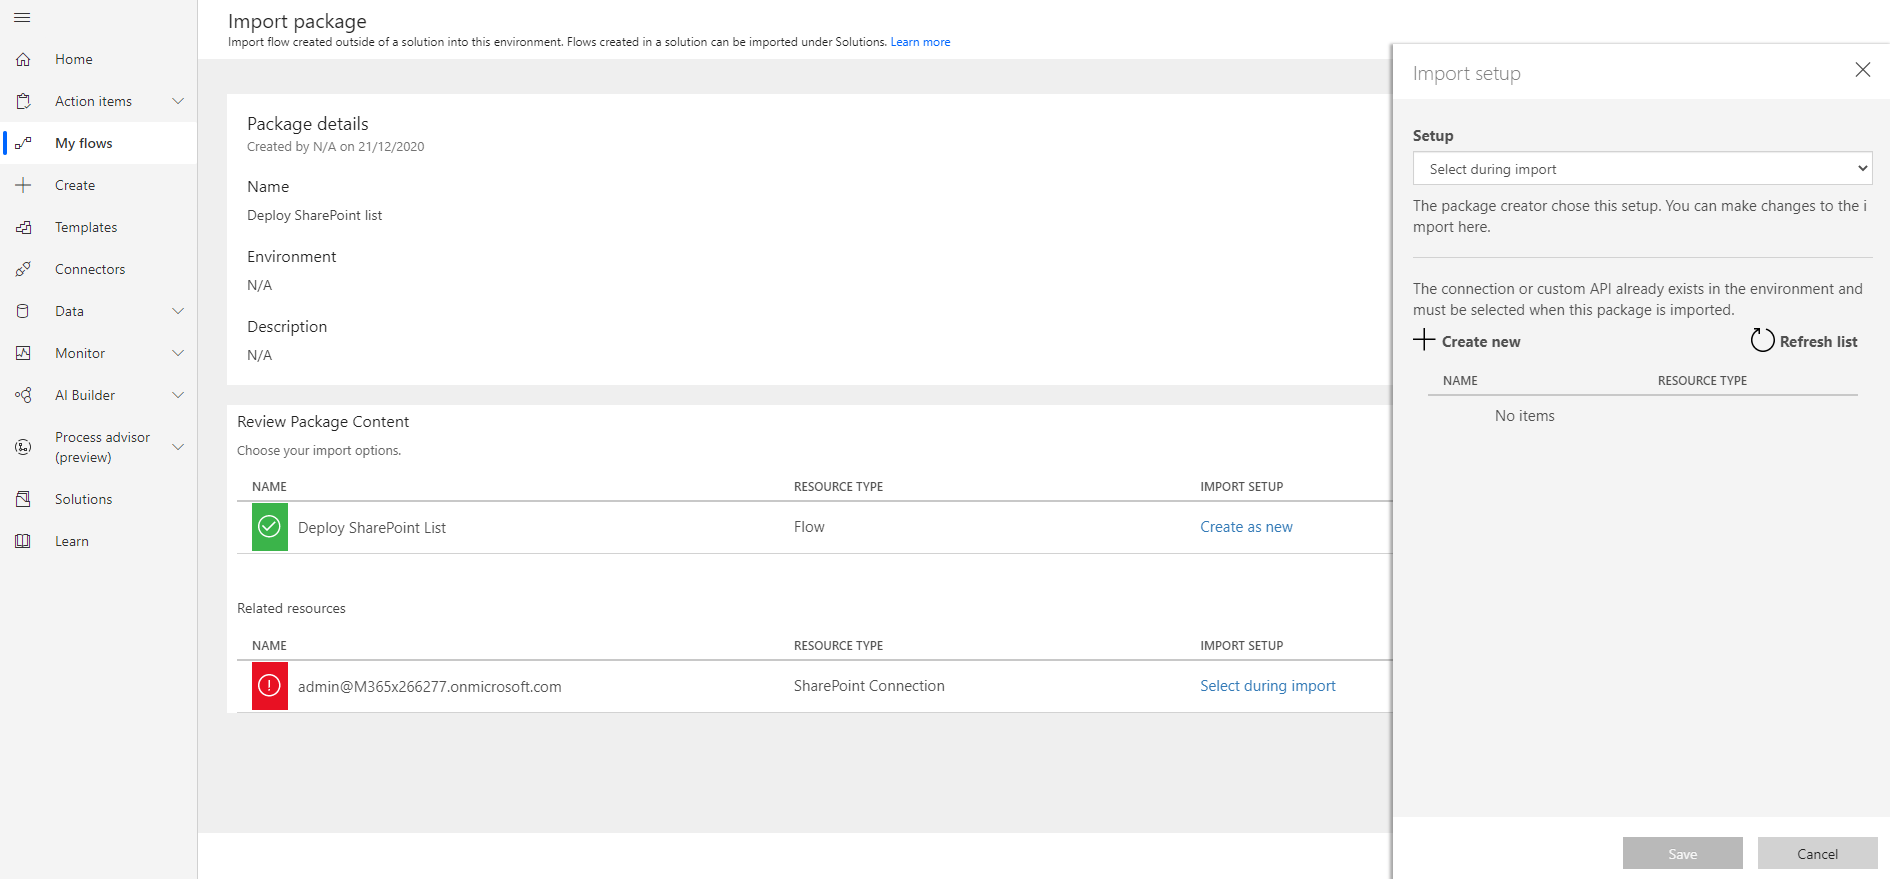
- If you need to create a new SharePoint connection, select + Create new in the Import setup pane.
note: a new tab/window will open to allow creating new connection keeping the existing tab open. Please do not close the existing tab.
- Select New connection on the command bar.

- Search for the SharePoint connector and click on +.
- Choose "Connect directly (cloud-services)"to connect to SharePoint online.
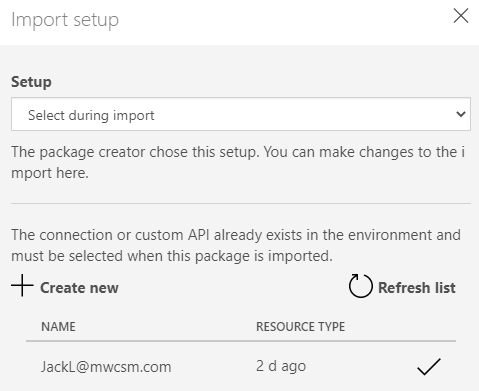
- Return to the tab where flow is imported, hit Refresh List, and select the connection you just created.
- Select Save, this will close the flyout menu.
- Select Import.
Edit the SharePoint List deployment flow
-
After the import is done, go to My flows and refresh the list of flows.
-
Select the newly imported flow, Deploy SharePoint Lists.
-
Select Edit on the command bar.
-
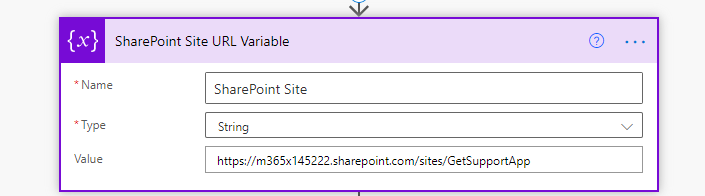
Open the 'Variable - Target Site for Lists' step card.
-
Under Value, change the URL with your SharePoint site (e.g. https://contoso.sharepoint.com/sites/GetSupportApp).
-
Select Save.
Run the SharePoint List deployment flow
- Click the back arrow to return to the detail screen for the Deploy SharePoint Lists flow.
- Turn on the flow in the command bar.
- Select Run on the command bar.
- Select Continue, and then select Run flow
Note: You might receive an error stating that location services are required. If this occurs, allow location services to access Power Automate and refresh the page before trying again.
-
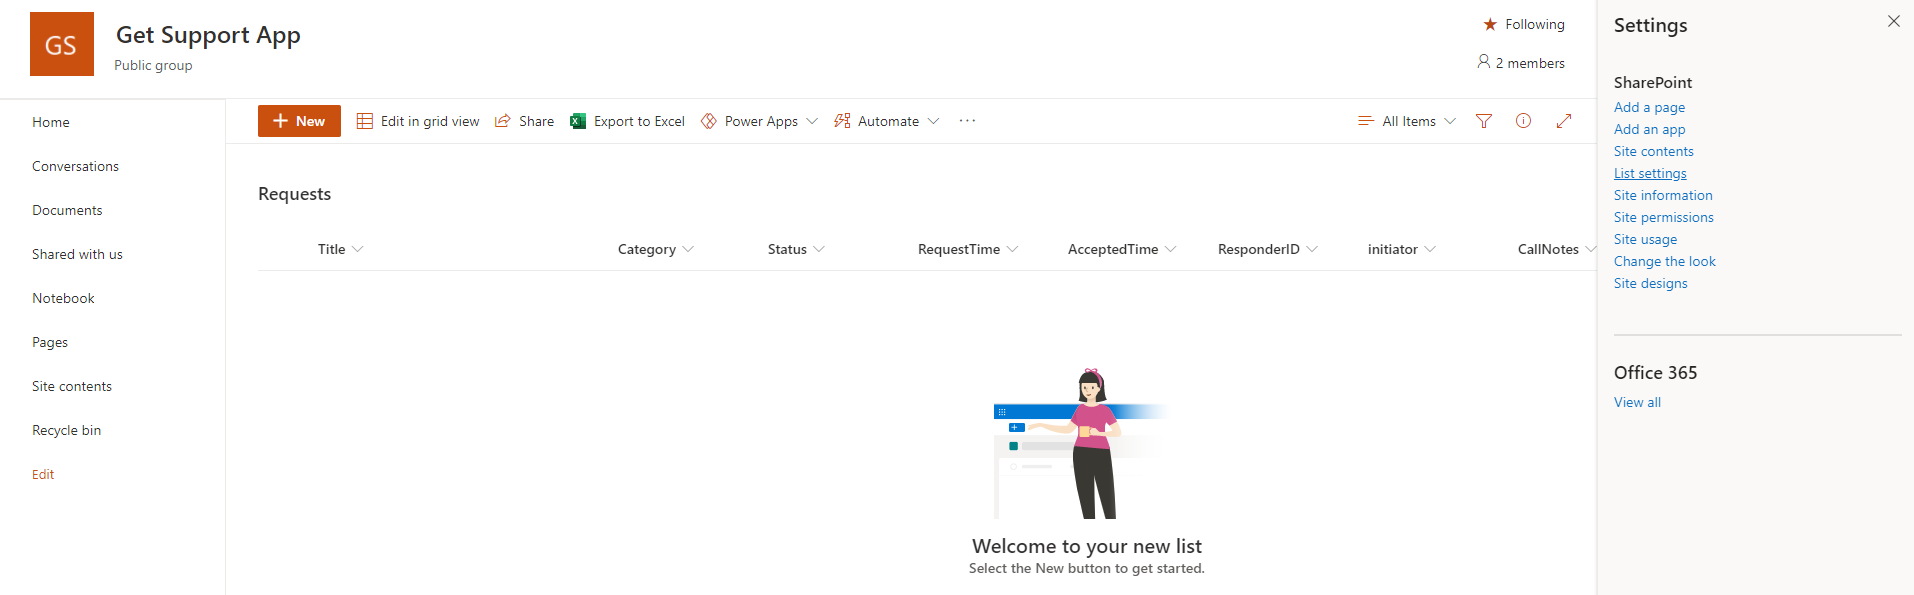
Run usually takes 30 seconds. Refresh the page until the run status changes from running to Succeeded.
-
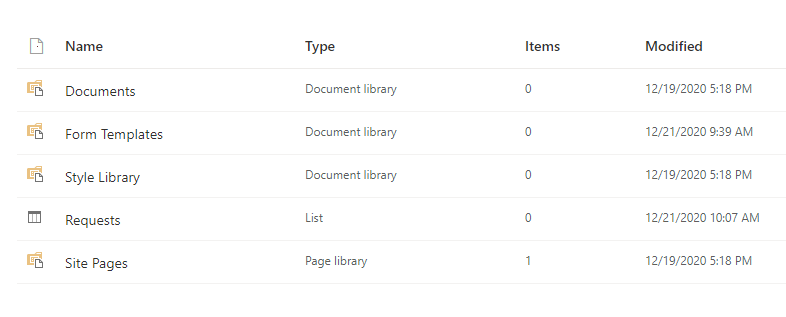
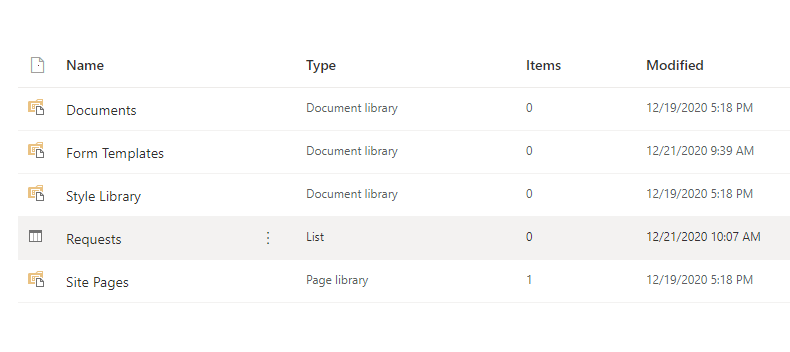
Navigate to your SharePoint site and verify below SharePoint list is created by clicking on the gear icon in the top right > Site Contents. Please check if there is 1 SharePoint List created (as shown in below screenshot).

SharePoint Security
SharePoint Lists should be configured using principal of least privilege. This is to ensure that the users are only given privileges that they require for seamlessly using the Apps in an intended way.
Note
-
Currently SharePoint site has been configured as Public. This means all users in your organization are members of the site.
-
Admins should be configured as owners of the site.
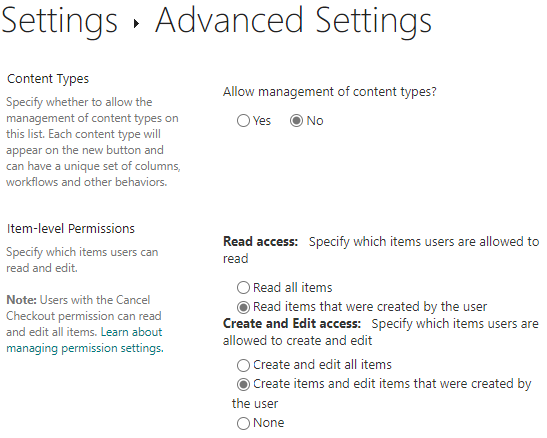
Steps below show how to set up permissions for the Requests list. Follow the steps below:
-
Navigate to the SharePoint site.
-
Click on the gear icon on top right and then click Site contents.
- Click on the Request list.
- Click on the gear icon on top right and then click List settings.

- Click on Advanced Settings.

- Change the Read access to Read items that were created by the user.
- Change the Create and Edit access to Create items and edit items that were created by the user.
- Scroll down and select OK.
Step 3: Import and set up the Get Support App
After all SharePoint Lists have been created, you can import the app and connect it to your new data sources.
Import the app
-
Sign in to Power Apps.
-
Select Apps from the left navigation pane.
-
Select 'Import canvas app' on the command bar.
-
Upload the GetSupport.zip file.
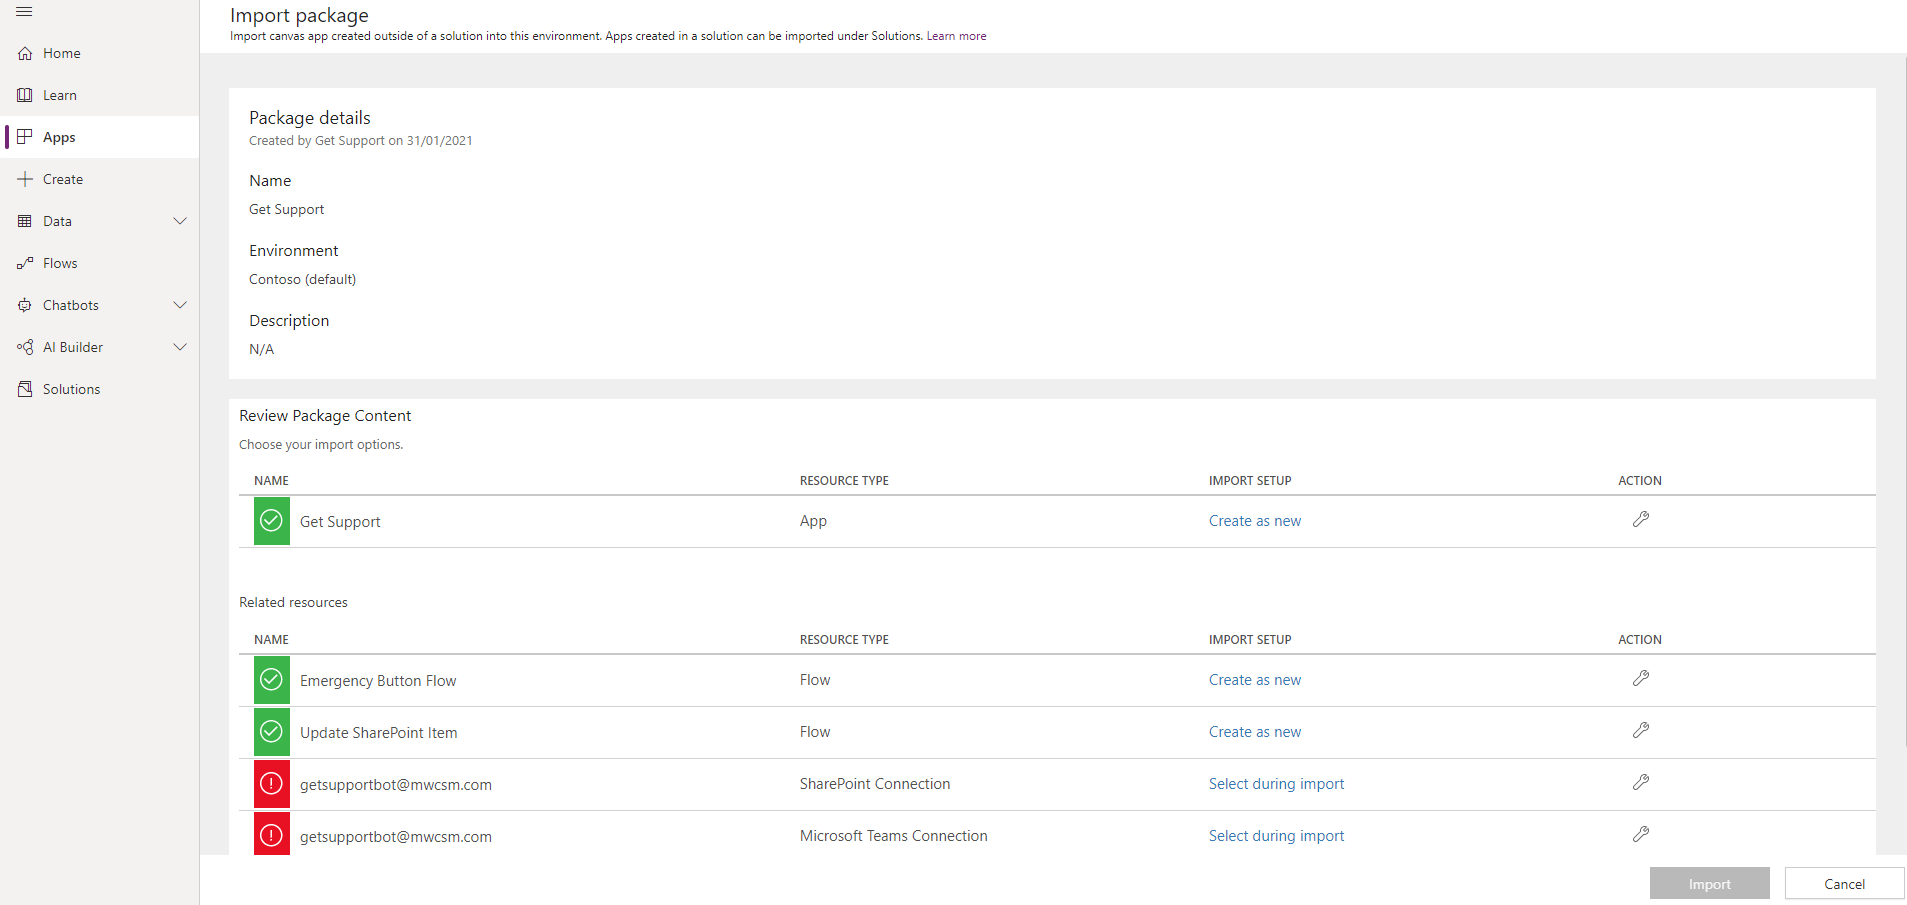
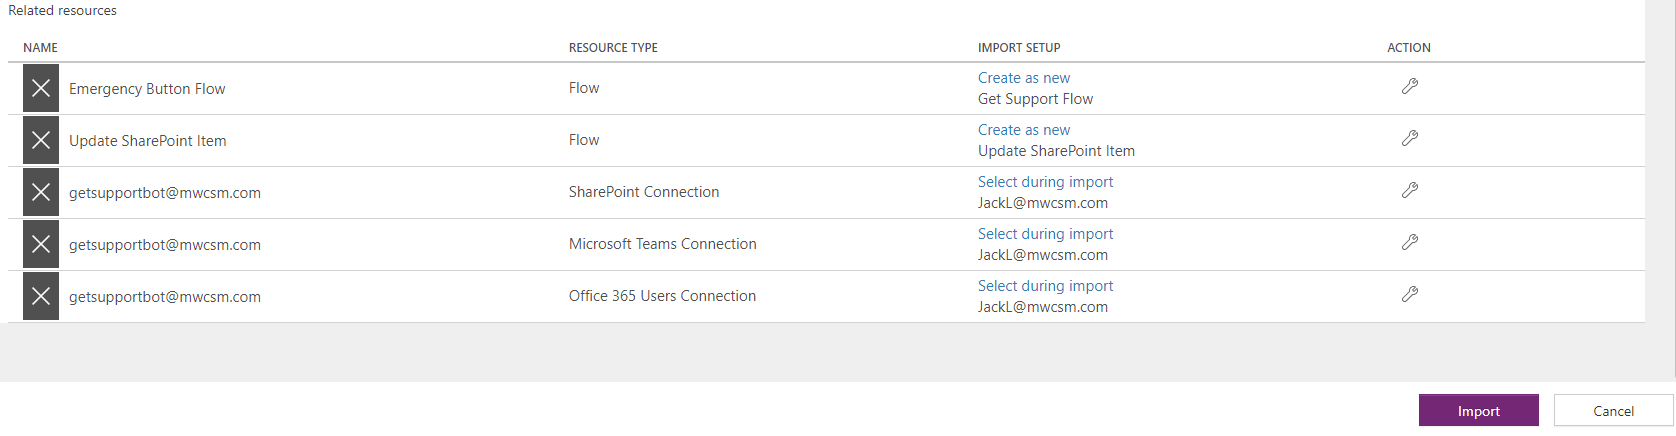
- Complete the import setup for SharePoint Connection, Microsoft Teams Connection and Office 365 Users Connection by selecting the appropriate connections by using the Select during import hyperlink. You might have to create a new connection for Office 365 users, Microsoft Teams and SharePoint, if it doesn't already exist.
note: a new tab/window will open to allow creating new connection keeping the existing tab open. Please do not close the existing tab.
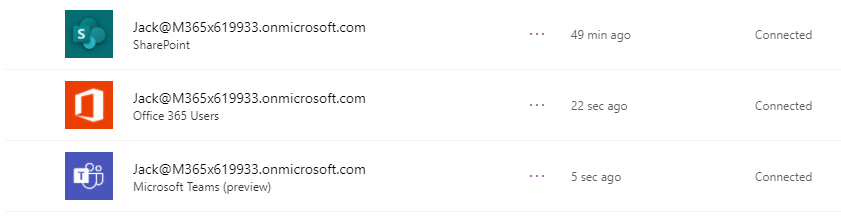
- Return to the existing tab, click on select during importan and make the necessary connection. Now select Import.
Configuring the app to fit your organisation
Once you have successfully imported the app, by default you will have three buttons "Police", "Fire" & "Ambulance". Now the app is imported you can edit the buttons using the Power Apps Studio. Follow the below steps to see how you can do this.
- Once the app has been opened in Power Apps Studio select from the Tree view 'App'.

- In the OnStart property you will see the following string.

- You could from here rename the three categories. However, you may want to add an additional button or remove a button. To do this you need to add or remove the following string of code ',{Label:"Button Name",Category:"Button Name"}' before the closed bracket. In the example below I have added a button.

- To add/remove the button to the app you now need to click on the three '...' next to the word App in the Tree view and click 'Run OnStart'.
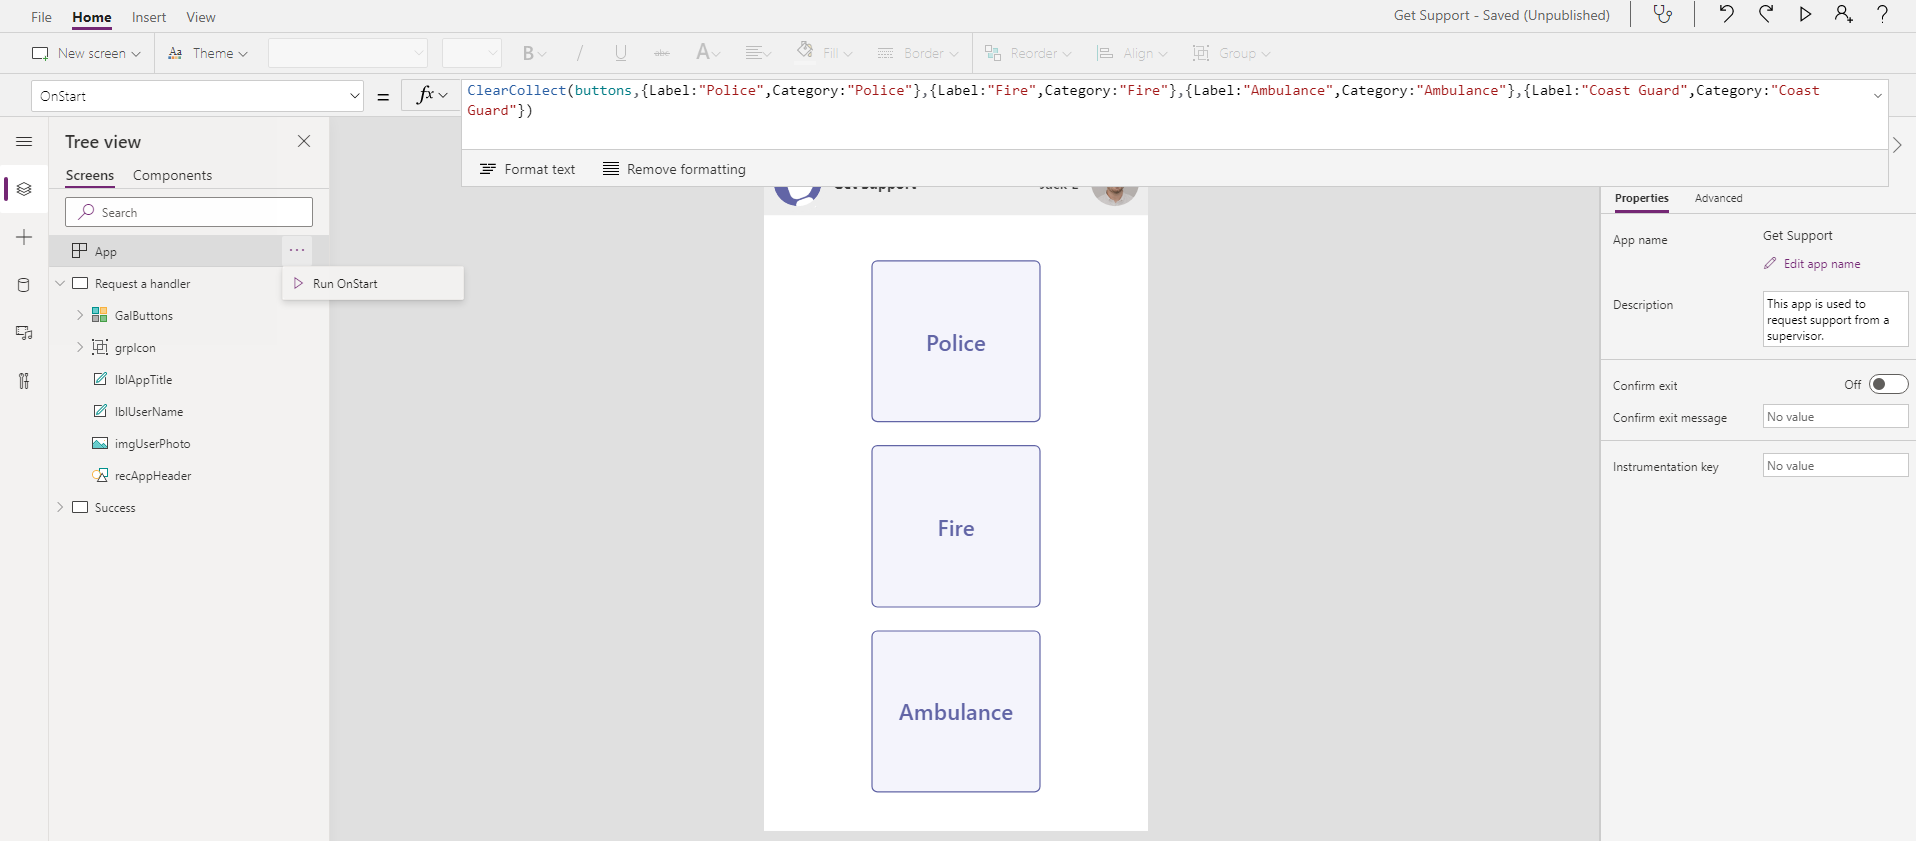
- Now you will see the app has automatically adjusted the buttons to fit on the display. This app will comfortably support 8 buttons on screen, but you could extend this.

- Don't forget to save and publish your changes. Otherwise users of the app see the default three buttons.
Update the Get Support Power Automate flows
These flows are called from within the Get Support app. This creates the emergency request in the SharePoint List. The flow passes the context information back to the Get Support App.
- Go to https://flow.microsoft.com.
- Select My Flows from the left navigation pane.
- Select More commands(...) for Get Support Flow, and then select Edit.

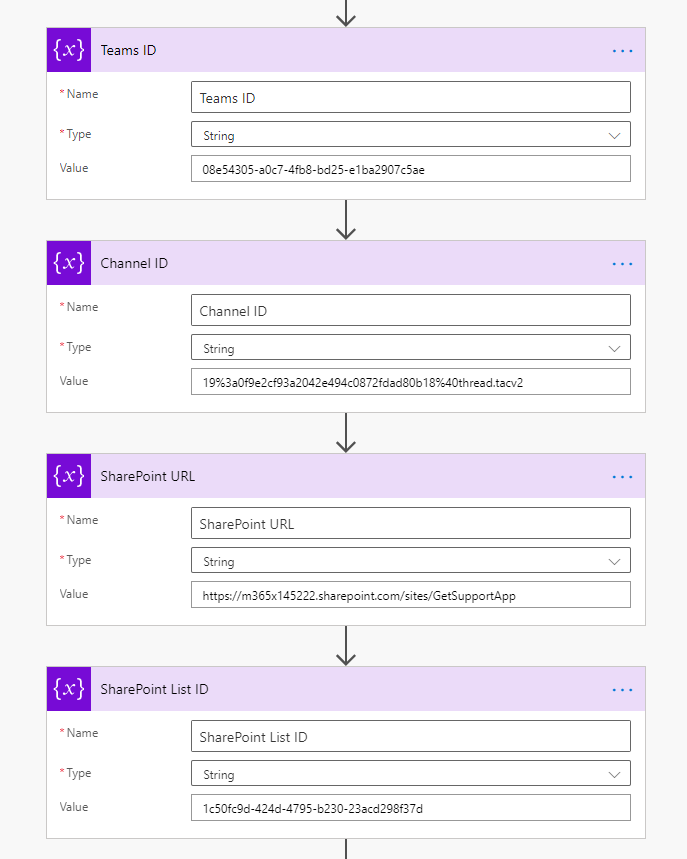
- Open the Teams ID step card.
- For Value, follow the below steps:
- Open Teams on the web and select the Team you want to use for emergency requests.
- Click on the three ellipsis(...) next to the team name you'd like to send requests to.
- Select Get link to team.

- Select Copy.
- Paste the link in the Teams ID step value.
- Remove all parts of the link except for the characters between groupId= & &tenantId. Example in the table below, do not click the hyperlink.
| Original Link | Value |
|---|---|
| https://teams.microsoft.com/l/team/19%3a61f89707427d42cb98e9cb06d9e6d717%40thread.tacv2/conversations?groupId=4f16e745-b27e-4684-9fff-629efc7feef1&tenantId=4cb1a860-c140-4899-9766-a121f56688ae | 4f16e745-b27e-4684-9fff-629efc7feef1 |
Your value should now look like this, but instead have a unique set of characters that relate to your chosen Teams site.

-
Select Save.
-
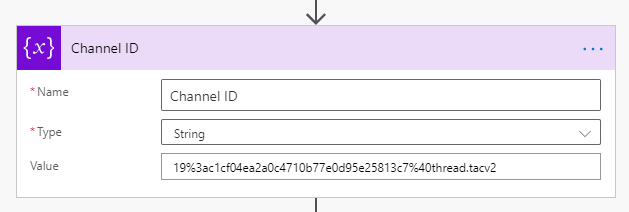
Open the Channel ID step card.
-
For Value, follow the below steps:
-
Open Teams on the web and select the Team you want to use for emergency requests.
-
Click on the three ellipsis(...) next to the channel name you'd like to send requests to.
-
Select Get link to channel.
-
Select Copy.
-
Paste the link in the Teams Channel step value.
-
Remove all parts of the link except for the characters between channel/ & /%. Example in the table below, do not click the hyperlink.
| Original Link | Value |
|---|---|
| https://teams.microsoft.com/l/channel/19%3ac1cf04ea2a0c4710b77e0d95e25813c7%40thread.tacv2/Emergency%2520Requests%2520%25E2%259D%2597?groupId=4f16e745-b27e-4684-9fff-629efc7feef1&tenantId=4cb1a860-c140-4899-9766-a121f56688ae | 19%3ac1cf04ea2a0c4710b77e0d95e25813c7%40thread.tacv2 |
Your value should now look like this, but instead have a unique set of characters that relate to your chosen Teams site.
-
Select Save.
-
Open the SharePoint URL step card.
-
For Value paste your SharePoint URL.

-
Select Save.
-
Open the SharePoint List ID step card.
-
For Value, follow the below steps:
-
Go to your SharePoint Request List. Click the gear icon on top right and then click List settings.
- In the browsers URL bar copy and paste the characters between %7B & %7D. Example in the table below, do not click the hyperlink.
| Original Link | Value |
|---|---|
| https://m365x619933.sharepoint.com/sites/EmergencyButton/_layouts/15/listedit.aspx?List=%7Bf176ffc3-1fb1-41df-b208-4d2723fbb8ab%7D | f176ffc3-1fb1-41df-b208-4d2723fbb8ab |

Your value should now look like this but instead have a unique set of characters that relate to your Request list.
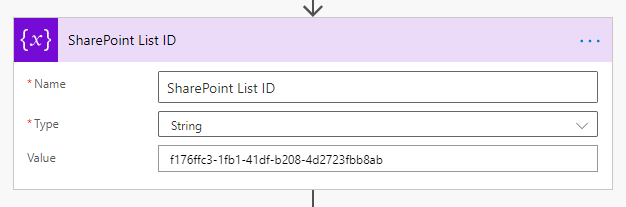
- Select Save.
- Click the back arrow to return to the detail screen for the Get Support Flow.
- Turn on the flow in the command bar.
Now we will follow the same steps for the Update SharePoint Item flow.
- Go to https://flow.microsoft.com.
- Select My Flows from the left navigation pane.
- Select More commands(...) for Update SharePoint Item flow, and then select Edit.
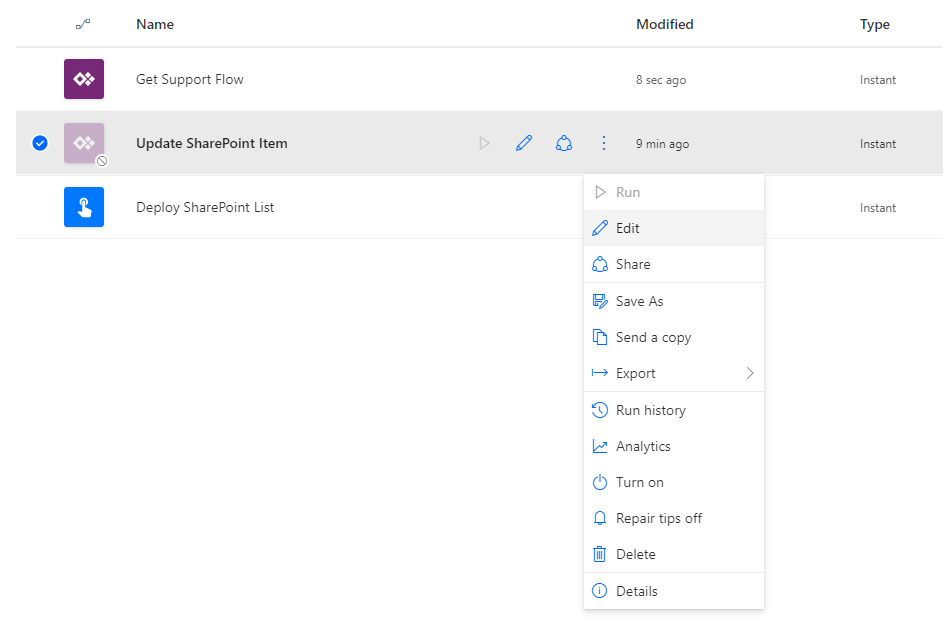
- In this Flow you will need to update the Teams ID, Channel ID, SharePoint URL and SharePoint List ID with the same information as you entered before in the previous flow.
- Select Save.
- Click the back arrow to return to the detail screen for the Get Support Flow.
- Turn on the flow in the command bar.
Configuring the Flow for your organisation
By default the Get Support App will send 3 reminders every 10 seconds. You may find that this is too quick or slow for your organisation and therefore want to change this behaviour.
- In the Get Support Flow you will need to open 'Reminder time in seconds' & 'Maximum reminders'.
- By deafult you will see 10 seconds & 3 reminders. You can now amend these to a value that better suits your purpose. Shown below:

- Finally, remember to press Save. Otherwise this behaviour will not change. You will know the flow has successfully been saved when you see the message 'Your Flow is ready to go. We recommend you test it'.
Step 4: Placing the Get Support App in Microsoft Teams
Sharing Power Apps
You need to share your Power Apps with relevant users in order to make the apps available to use. For guidance on sharing a canvas app, refer to this article.
It is important that you share the apps with right users. As an example,
- Get Support App can be shared with all users in your organisation who are could be required to request access.
Deploying Get Support App to Microsoft Teams
Deploying the Get Support App to Microsoft Teams is an easy way to promote adoption, minimize distractions, and amplify immediate action across the organization. Microsoft Teams Admins, as well as end-users, can add this app to Microsoft Teams, albeit with slightly different steps. Once you have downloaded the app following the written or video instructions above, the steps below walk through the process to deploy it to Microsoft Teams.
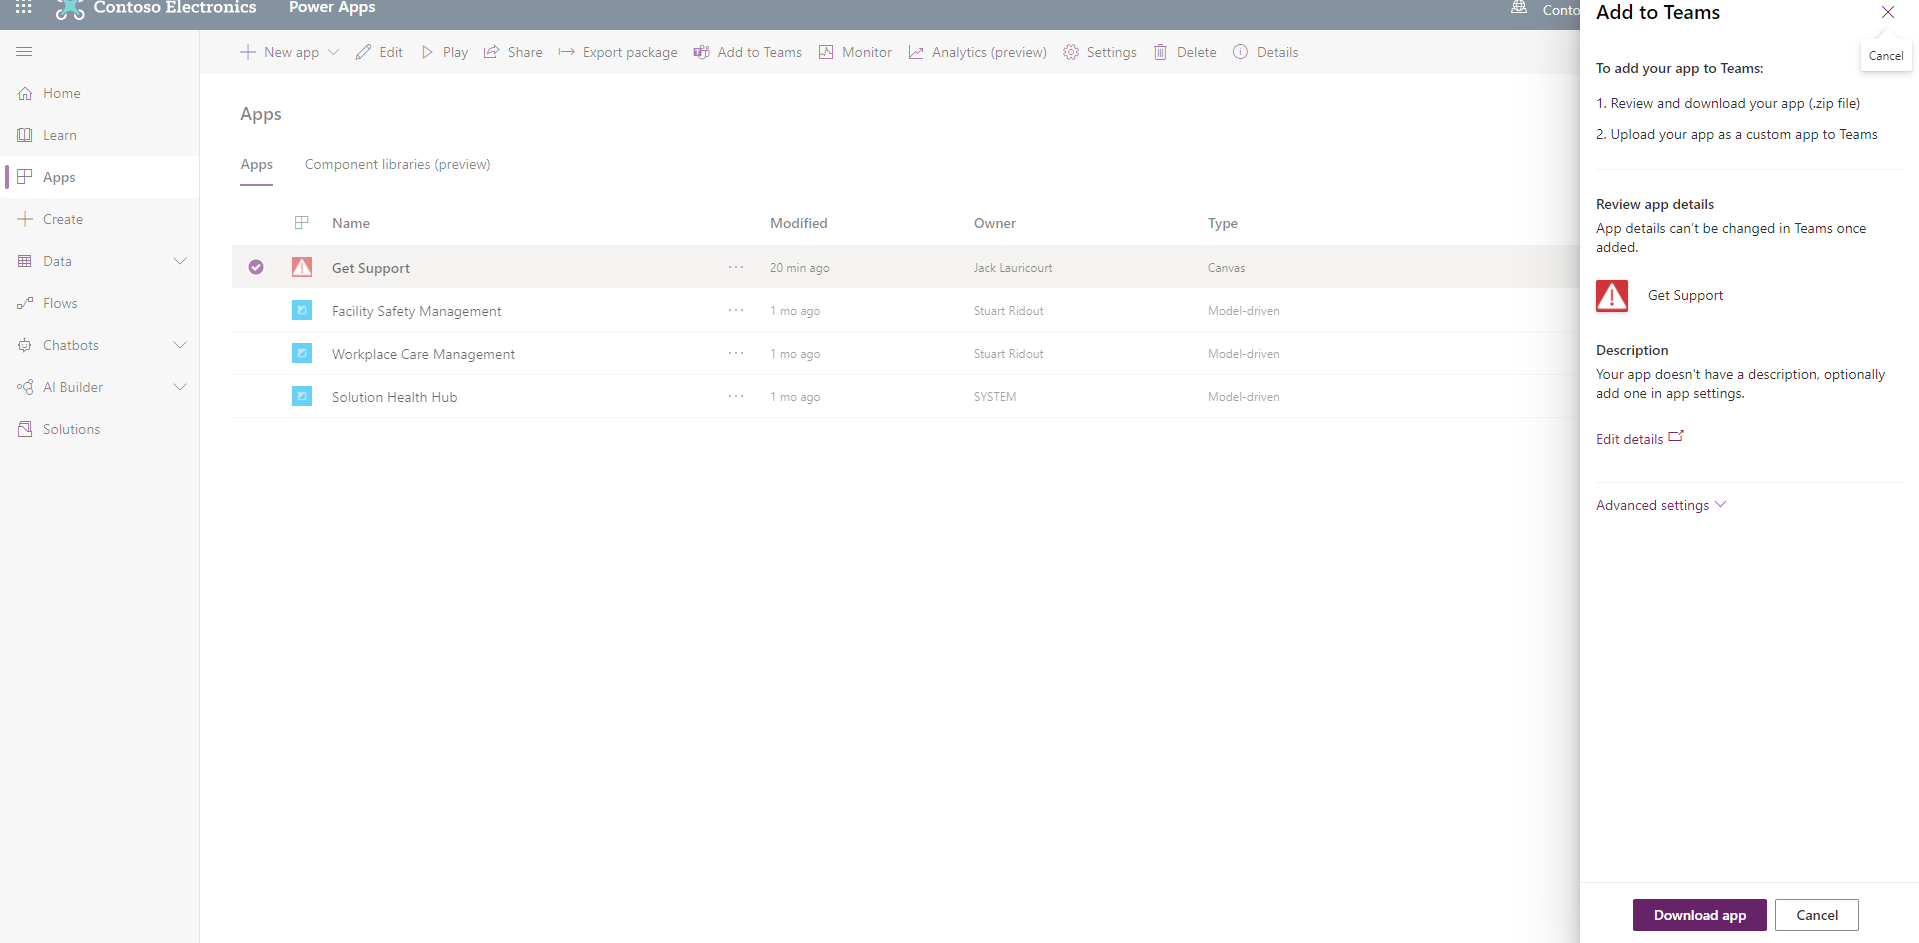
Download the Get Support App from Power Apps Homepage
-
Navigate to https://make.powerapps.com
-
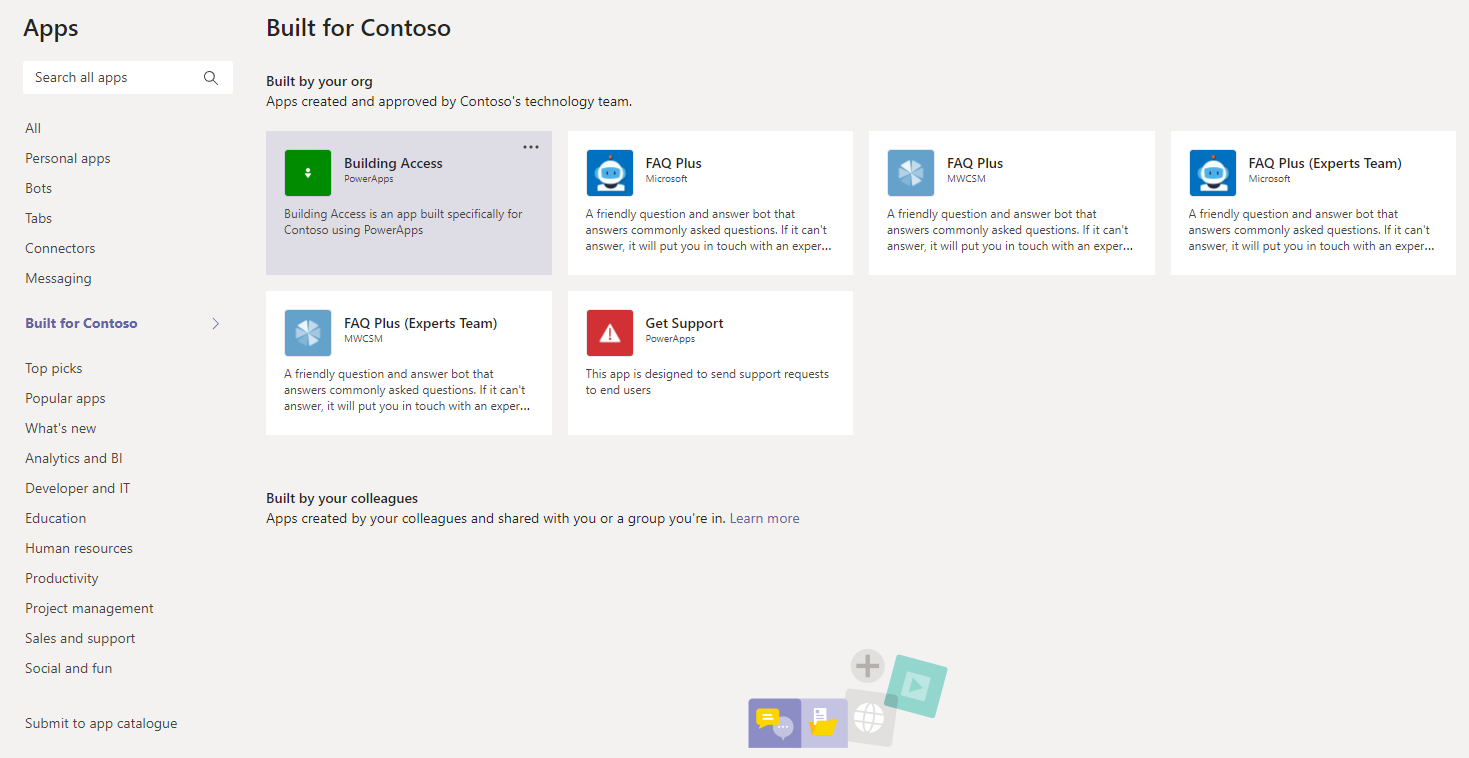
The Get Support app should appear under "My Apps".
-
Click the "..." to the right of the app name, then select the "Add to Teams" option.

- Click Download app.
Add app to your Microsoft Teams app store
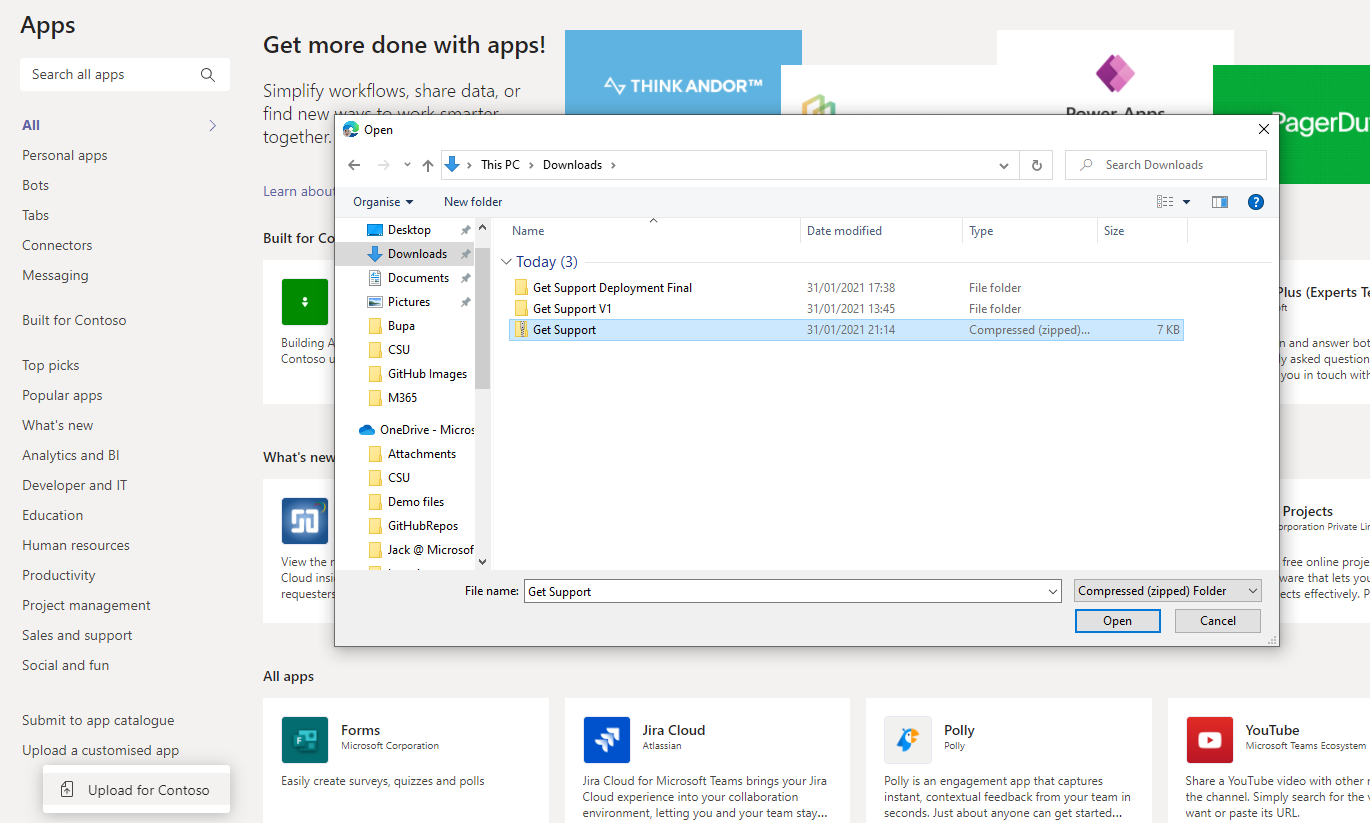
- Now the GetSupport.zip file has been downloaded you will need to alter the App ID.
Extract the GetSupport.zip file on your computer and edit the manifest.json file.
Replace AppID with 5c41e312-43b8-49db-ac98-68dedb87493c and save the manifest.json
Rezip the 3 files (Manifest and two icons)
-
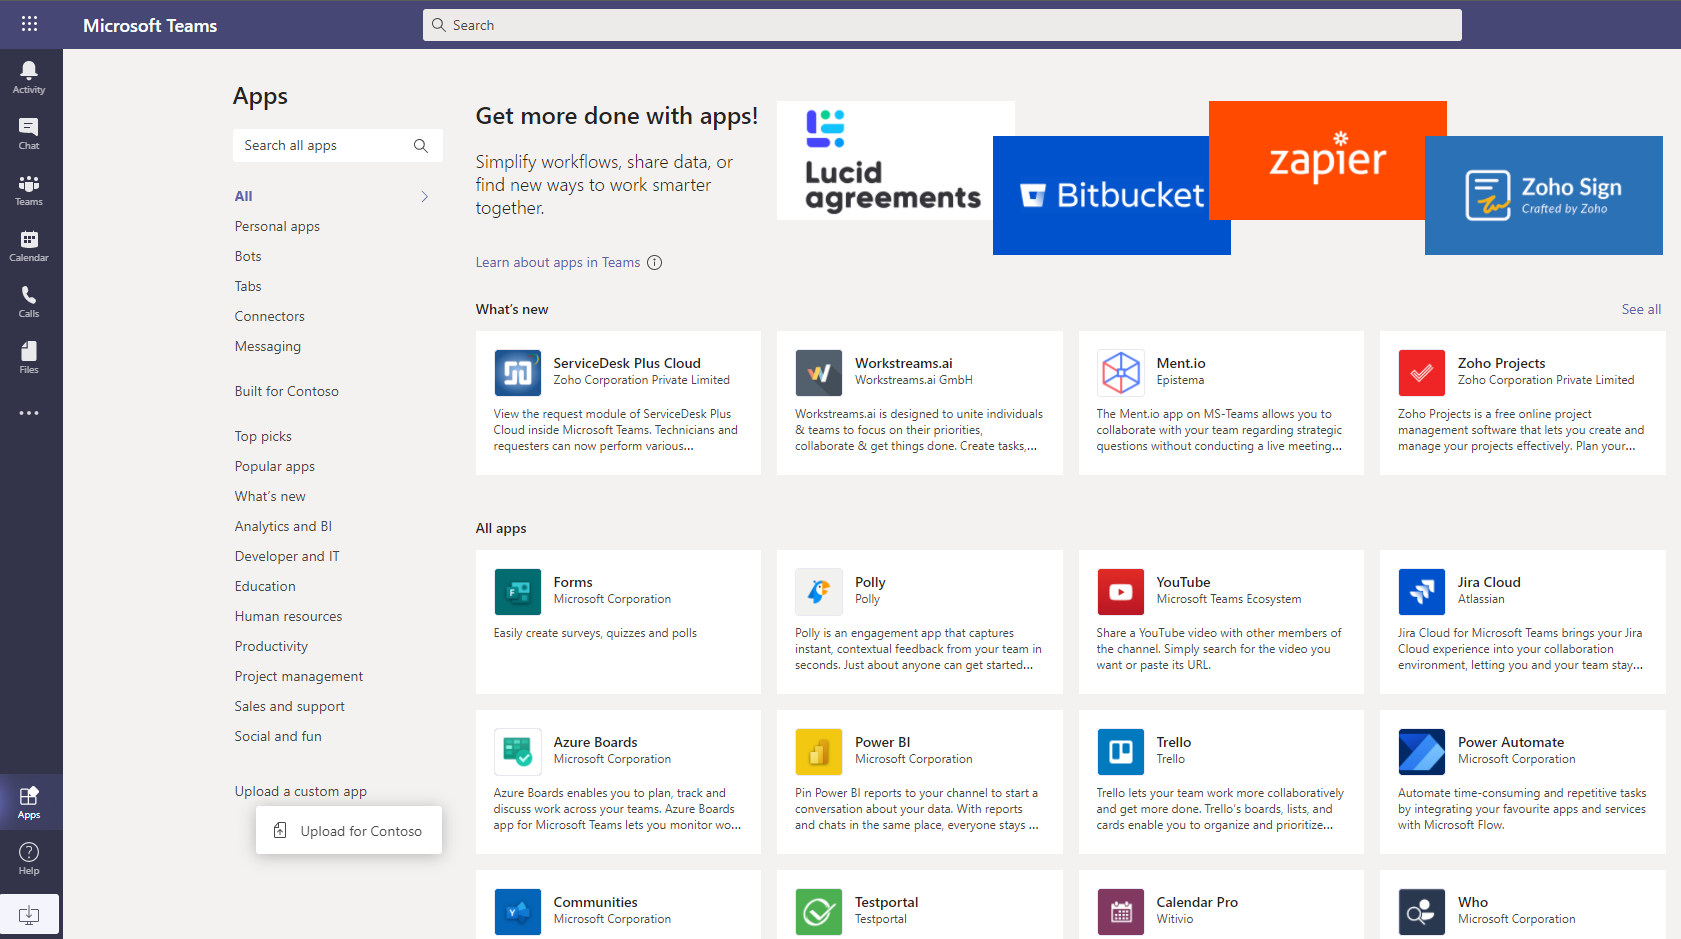
Once the app ID has been altered and rezipped open Microsoft Teams and navigate to the app store.
-
Use the "Upload a custom app" function at the bottom-left. If you don't see Upload a custom app option it may mean that this option is disabled for your organisation. Contact you team's administrator to further support you.
- Click Upload for [Organisation Name].
- Upload the zip file you downloaded from Power Apps in the prior step.
- Once uploaded, the app appears in the app store.
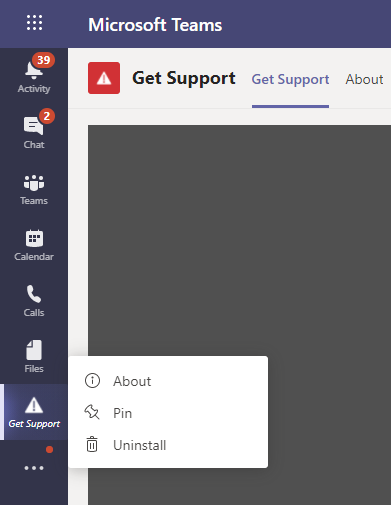
Pin the app to your personal Microsoft Teams app bar (any Microsoft Teams user)
Even if your Teams Admin has not taken steps to add this app to the Microsoft Teams app bar for your tenant, any user can add this app their personal app bar.
- Click the app from the app store.
- Click Add to add app to your app bar.

- Once the app icon appears on your app bar, right click the icon and select "pin". The app icon will remain on your app bar to provide you easy access, even after you navigate away from the app.
Step 5: Setup Power BI report to analyse insights from the app (Optional)
Downloading Power BI Desktop
In order to configure the Power BI dashboards for the Get Support app. You will need to download and install [Microsoft Power BI Desktop.] (https://www.microsoft.com/en-us/download/details.aspx?id=58494)
Configure Power BI
-
Download the Power BI package which contains the sample report to your local folder. Click here and then click on "Download" button.
-
Open the Power BI file in Power BI desktop and click on “Transform Data” from the “Home” menu at the top and click on the “Data Source Settings”.

- Click on "Change Source" from the modal dialog box:
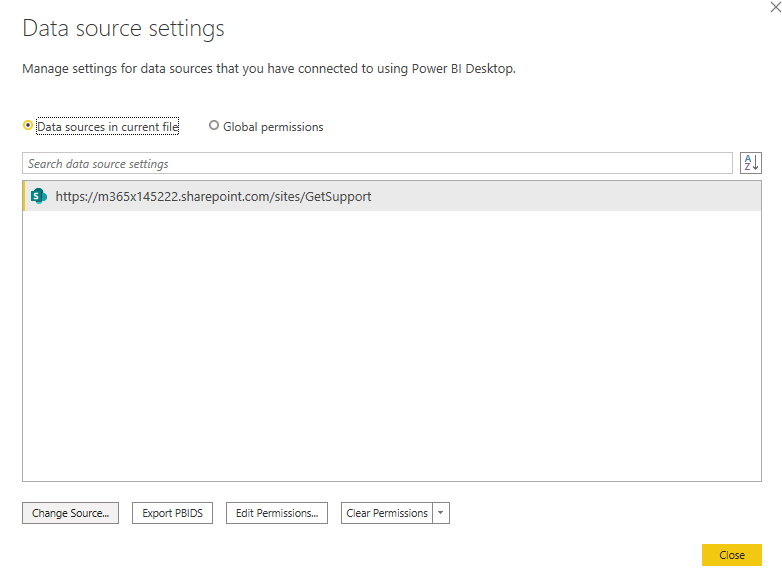
- Update the SharePoint URL and click on OK and then click Close buttons:

-
After you update the SharePoint URL you will see an error for “Edit Credentials”, click on the “Edit Credentials” and choose “Microsoft Account” from the Authentication pop up, select the site from the drop-down “Select which level to apply these settings to” and click “Sign In”.
-
After clicking on "Sign In" it should ideally open up a modal window asking you to select your User ID or enter User ID. Select your User ID and click “Connect”.
-
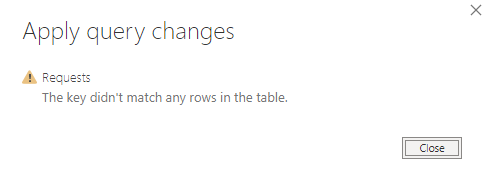
You will need to apply pending changes.

- As we're transforming the data you will see this pop up "Apply query changes", click close:
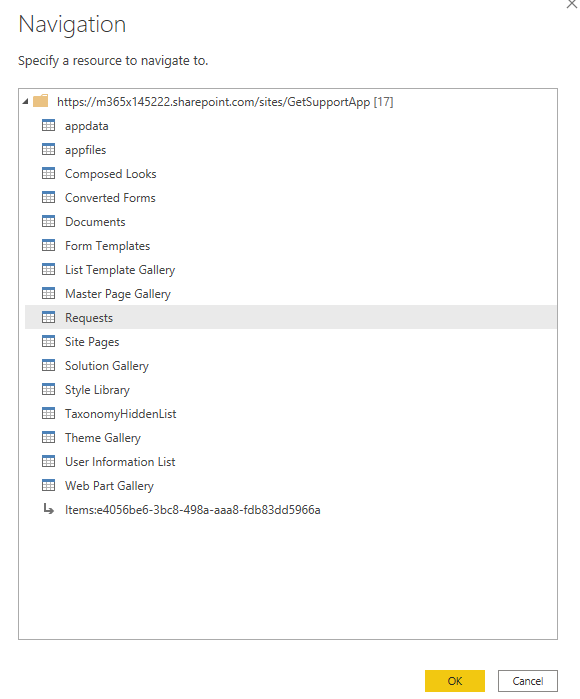
- Click on "Transform Data" in the "Home" tab. Now in the Power Query Editor you will see an error. Click on "Go To Error":

- Now click on "Edit Settings" and then select "Requests" before clicking "OK":
You may also need to remove "Renamed Columns". If you recieve an error follow the steps we just followed to rectify this.
-
Now click "Close & Apply" in the "Home" tab.
-
Once you eliminate any errors you should see the query change being applied and the report will now point to the SharePoint list you created.
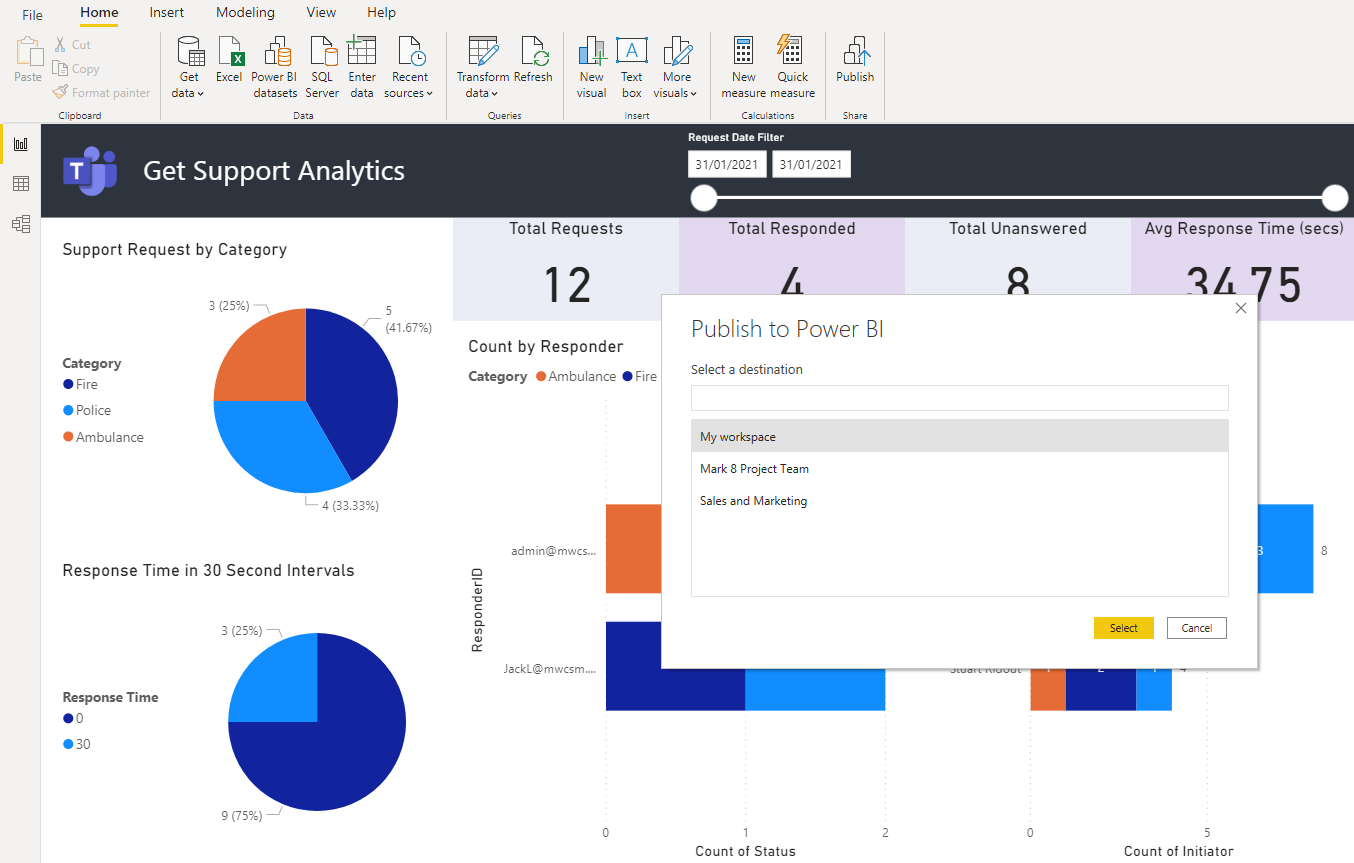
Publish the report
- Click on Publish to publish your Power BI Dashboard to the Power BI Service. You can find the "Publish" button on the "Home" tab. Select the appropiate O365 group in which you want to publish the report and click on "Select"
Share the Power BI report
-
Go to the Power BI portal.
-
Click on "My Workspaces". Then click the share icon and choose the relevant users you'd like to see the report by adding their names.
Add Power BI report to a Teams channel
Please ensure you have published the Power BI report as explained in the above steps before going ahead with the next steps.
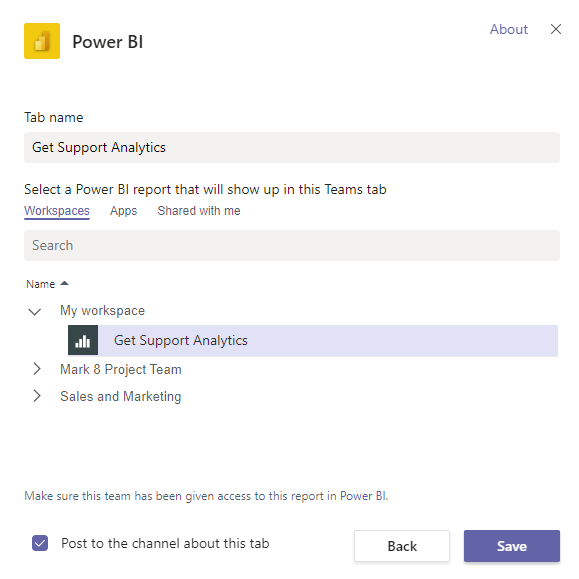
- Navigate to the Teams channel in which you want to add the Power BI Dashboard and click on the "+" icon in the channel you'd like the dashboard to live. Click on Power BI and choose the Get Support Analytics dashboard.
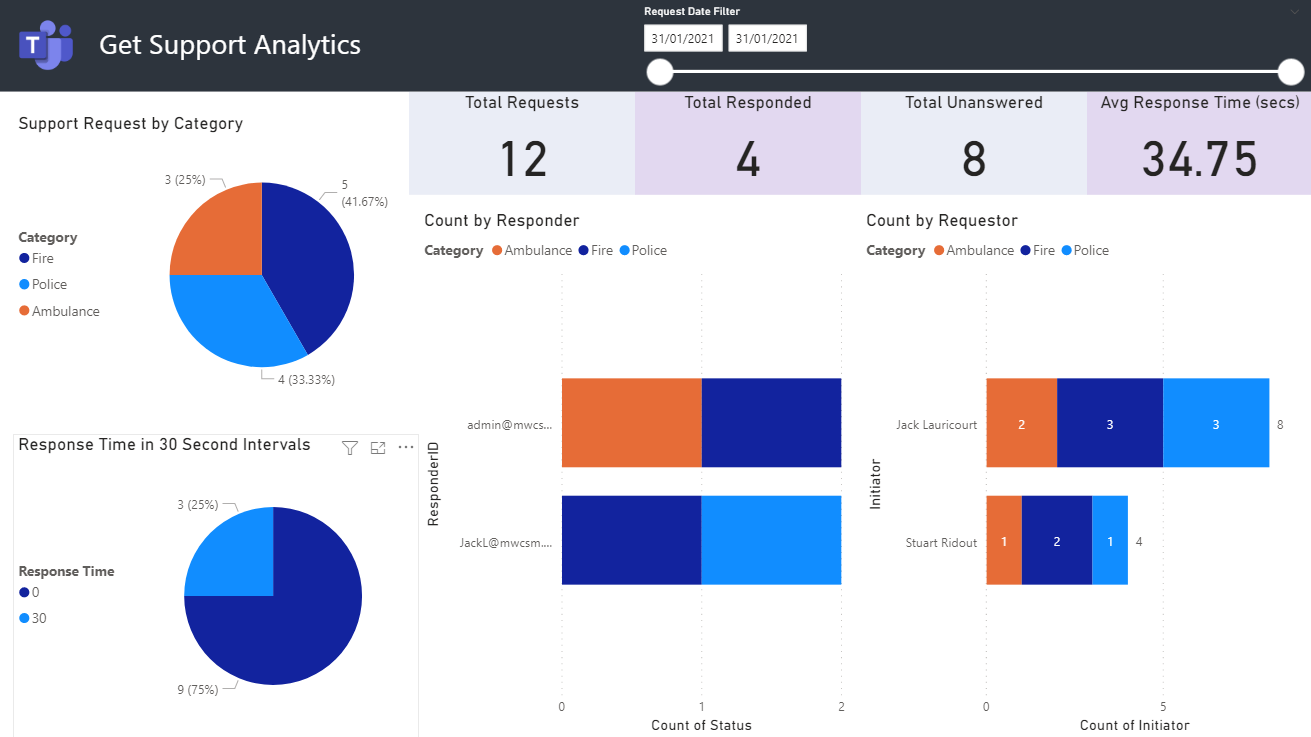
- After saving the Power BI dashboard it will now open in the Teams channel like below:

It is recommended to schedule a refresh frequency of Power Bi to see the updated data published. You can find out further information here.