Brushes - KevinDaGame/VoxelSniper-Reimagined GitHub Wiki
Credit for most brush explanations goes to SuperMonis with his awesome VoxelSniper guide! For more information: see the original documentation: https://web.archive.org/web/20140323101907/http://www.voxelwiki.com/minecraft/Voxelsniper#Shell_Brushes
name: Ball
commands: ball, b
usage:
permission: voxelsniper.brush.ball
This brush lets you spawn a sphere with the center block being the one you right clicked on.
name: Biome
commands: bio, biome
usage:
permission: voxelsniper.brush.biome
This brush lets you set the biome of the area you right clicked on. The biome will be spawned in a circle shape, with the size of the radius you chose. Note: You currently cannot undo biome changes with the undo command
name: Biome ball
commands: biomeball, bioball
usage:
permission: voxelsniper.brush.biomeball
- You currently cannot undo biome changes with the undo command
- Due to internal minecraft logic, biomes don't become perfect spheres
- If you move a build with for example schematics, the biomes won't move, they will remain behind
- If a player has Biome blending disabled, it will look strange since there won't be a blending between different coloured leaves
name: Blend Ball
commands: bb, blendball
usage:
permission: voxelsniper.brush.blendball
You can use this tool to blend out any terrain. It will smooth out the area you are right clicking, in the shape of a sphere.
name: Blend Disc
commands: bd, blenddisc
usage:
permission: voxelsniper.brush.blenddisc
You can use this tool to blend out any terrain. It will smooth out the area you are right clicking, in the shape of a circle (disc).
name: Blend Voxel
commands: bv, blendvoxel
usage:
permission: voxelsniper.brush.blendvoxel
You can use this tool to blend out any terrain. It will smooth out the area you are right clicking, in the shape of a cube (voxel).
name: Blend Voxel Disc
commands: bvd, blendvoxeldisc
usage:
permission: voxelsniper.brush.blendvoxeldisc
You can use this tool to blend out any terrain. It will smooth out the area you are right clicking in the shape of a square (voxel, disc).
name: Blob
commands: splatblob, blob
usage:
permission: voxelsniper.brush.blob
This can be used to spawn a random blob of the block you specified before. The size of the blob will depend on the radius you put.
name: Block Reset Brush
commands: blockresetbrush, brb
usage:
permission: voxelsniper.brush.blockresetname: Block Reset Brush Surface Only
commands: blockresetbrushsurface, brbs
usage:
permission: voxelsniper.brush.blockresetsurfacename: Canyon
commands: ca, canyon
usage:
permission: voxelsniper.brush.canyonThis will create a huge air space in the shape of a cuboid in the ground. At the bottom of the canyon it will have one layer of grass, one layer of dirt underneath and then 8 layers of stone underneath that, followed by a layer of bedrock.
name: Canyon Selection
commands: cas, canyonselection
usage:
permission: voxelsniper.brush.canyonselection
By left clicking one block and left clicking another block, you can create a canyon within that area you selected. No radius is needed for this brush type.
name: Checker Voxel Disc
commands: cvd, checkervoxeldisc
usage:
permission: voxelsniper.brush.checkervoxeldisc
This will spawn a checkered pattern on the level you clicked on, with the center point being where you clicked. The block you chose will be the one spawning, the other block involved with the pattern will be the one that was already there, where you spawned the pattern.
name: Clean Snow
commands: cleansnow, cls
usage:
permission: voxelsniper.brush.cleansnow
This will clean up any mess of snow you’ve made. It won’t affect your snow unless you have used the snow decoration block to stack up many times.
name: Clone
commands: cs, clonestamp
usage:
permission: voxelsniper.brush.clonestamp
Clone a region using the powder tool. Paste the cloned blocks using the arrow tool.
The cloned region is a cylinder, centered around the target block in X/Z and starting at the target block in Y.
The height can be set using /vh <height>, the radius using /b <size>. The region can be translated up/down using /vc <count>.
Modes:
- Default: Replace all blocks (also replacing non-air blocks with air)
/b clonestamp default - Fill: Replace only air blocks
/b clonestamp fill - No-air: Replace all blocks, except if the replacement-material is air
/b clonestamp air
https://www.youtube.com/watch?v=iVEjunNgo2U
name: Comet
commands: com, comet
usage:
permission: voxelsniper.brush.cometname: CopyPasta
commands: cp, copypasta
usage:
permission: voxelsniper.brush.copypastaname: Cylinder
commands: cylinder, c
usage:
permission: voxelsniper.brush.cylinderThis will spawn a cylinder with the center point being where you clicked.
name: Disc
commands: d, disc
usage:
permission: voxelsniper.brush.disc
This will spawn a horizontal circle. The center point will be where you clicked to spawn the disc, and it will be spawned on the same level that you clicked.
name: Disc Face
commands: df, discface
usage:
permission: voxelsniper.brush.discface
This will also spawn a circle, however whether or not it is vertical or horizontal will depend where you are facing. If you are facing straight your disc will spawn vertical, and if you are facing down/up your circle will be horizontal.
name: Dome
commands: dome, domebrush
usage:
permission: voxelsniper.brush.domename: Drain
commands: drain
usage:
permission: voxelsniper.brush.drainThis will allow you to drain water in a brush. It will only drain the amount of water that is within your chosen radius. You can use /b drain d to only drain one layer of water - the ‘d’ stands for ‘disc’. To disable that option you can type the command again.
name: Ellipse
commands: ellipse, el
usage:
permission: voxelsniper.brush.ellipsename: Ellipsoid
commands: elo, ellipsoid
usage:
permission: voxelsniper.brush.ellipsoidname: Entity
commands: en, entity
usage:
permission: voxelsniper.brush.entityname: Entity Removal Brush
commands: er, entityremoval
usage:
permission: voxelsniper.brush.entityremovalname: Eraser
commands: eraser, erase
usage:
permission: voxelsniper.brush.eraserThis will remove anything within the radius at the point you click. If you did this by mistake, you can use /undo to undo any changes you made. This is done in the shape of a cube.
name: Erode
commands: e, erode
usage:
permission: voxelsniper.brush.erodename: Extrude
commands: extrude, ex
usage:
permission: voxelsniper.brush.extrudeThis command lets you push (arrow tool) or pull (gunpowder tool) anything in a cylinder shape. To set the height of what copies you must use /vh (height) and your radius is set using /b (radius). To set the block that you want to be pushed or pulled, use /vl (block).
name: Fill Down
commands: fd, filldown
usage:
permission: voxelsniper.brush.filldown
This will create a circle that has been copied all the down to the next surface below. The circle will be the size of the radius you specified and it’ll be created with the block you chose.
name: FlatOcean
commands: fo, flatocean
usage:
permission: voxelsniper.brush.flatoceanname: Generate Tree
commands: gt, generatetree
usage:
permission: voxelsniper.brush.generatetreeAs of version 8.6.0 it is possible to set leaves and wood block to any block, not just leaves and woods
name: Jagged Line
commands: j, jagged
usage:
permission: voxelsniper.brush.jaggedlinename: Jockey
commands: jockey
usage:
permission: voxelsniper.brush.jockeyname: Lightning
commands: lightning, light
usage:
permission: voxelsniper.brush.lightningname: Line
commands: l, line
usage:
permission: voxelsniper.brush.lineThis will spawn a line. You use the arrow to set the first point, and then the gun powder to set your second point. It will not tell you that you have set your second point, but rather just spawn the line. No radius is needed for this brush but you will need to specify a block for the line to be made out of.
name: Move
commands: mv, move
usage:
permission: voxelsniper.brush.move
This will allow you to move a selected area by a certain amount of blocks. You must use the arrow to set your first position and your gunpowder to set your second position, the area within that will be what you are moving. The x coordinate is how many blocks you will move the area east, the y coordinate is how many blocks you want to move it up, and the z coordinate is how many blocks you want to move it south. To move something in the opposite direction, use a minus number.
name: OCEANATOR 5000(tm)
commands: ocean, o
usage:
permission: voxelsniper.brush.oceanname: Overlay (Topsoil Filling)
commands: over, overlay
usage:
permission: voxelsniper.brush.overlayYou can use the gunpowder to spawn cylinder shapes on top of a layer. They will spawn in the specified blocks and within the radius.
name: Painting
commands: painting
usage:
permission: voxelsniper.brush.paintingname: Pull
commands: pull
usage:
permission: voxelsniper.brush.pullYou can use this command to pull anything up within a certain radius and to a certain height. To choose the radius you use /b (radius) and to set the brush height (how high you pull it to) use /vh (height).
name: Chunk Generator 40k
commands: rc, regeneratechunk
usage:
permission: voxelsniper.brush.regeneratechunk
This brush regenerates a chunk to it's state when the world first loaded. This state may have cut of trees or structures
name: Ring
commands: ring, ri
usage:
permission: voxelsniper.brush.ringname: Ruler
commands: r, ruler
usage:
permission: voxelsniper.brush.rulerBy using your arrow to set your first point and then the gun powder to set your second, you are able to see the distance between your first and second positions.
name: Scanner
commands: sc, scanner
usage:
permission: voxelsniper.brush.scannername: Set
commands: set
usage:
permission: voxelsniper.brush.setThis command requires you to specify a block using the /v (block) command. You can use the arrow to set your first point and the gunpowder to set your second, then the area within those points will be set to the block you chose.
name: Schematic
commands: schem, schematic, stencil
permission: voxelsniper.brush.schematic
As the name says, the schematic brush is used to paste schematics. This brush has some distinct advantages over say worldedit. Firstly, the brush is able to randomly select a schematic if they're placed in a folder. Secondly, schematics can be randomly rotated. Combined, this functionality can be leveraged to create forest and more effectively
In order to use this brush, you must have at least one schematic in the schematics folder. On spigot or related platforms, you can find this folder at ./plugins/VoxelSniper/schematics. On forge, you can find this in your game folder. You can navigate to ./config/VoxelSniper/schematics. The schematics must have a .schem extension. For now, these can only be made by using an external tool like WorldEdit. We are looking into adding this functionality to voxelsniper itself.
The following parameters can be used with the SchematicBrush:
- schem : Loads the specified schematic(s) for pasting.
- rotate < degrees>: Sets the rotation mode for the paste operation. Valid values for are 0, 90, 180, 270, and random. Random will pick a random angle from the options, and will rotate the schematic differently each time you paste it.
- flip : Sets the flip mode for the paste operation. Valid values for are x,y, z, and none. If you set this, the schematic will be flipped on that axis
- mode : Sets the paste mode. Valid values for are FILL, FULL, and REPLACE.
- list: Lists all available schematics that can be loaded.
when loading schematics, there are three cases. The first is, that the name you enter will correspond with a file named <input>.schem where input is the name you entered. In this case, that schematic is loaded.
The second case is that the name you entered will correspond with a folder with that name. In this case, all schematics in the folder are loaded, and one is picked randomly on each paste.
The final case is that your input matches neither. In this case no schematic will be loaded.
The valid paste modes are fill, full and replace.
- Full: Full is the default mode. It will replace all blocks in the schematic with the block recorded in the schematic. Note: this means that stone would be replaced by air.
- Fill: Fill will only replace air blocks. So any blocks that are not air that exist before applying the schematic, will not be altered.
- Replace: Replace is the opposite of fill. Replace will replace any non air blocks. Air blocks alone will not be altered
name: Shell Ball
commands: shb, shellball
usage:
permission: voxelsniper.brush.shellball
This will spawn a sphere with the radius and block you specified.
name: Shell Set
commands: shs, shellset
usage:
permission: voxelsniper.brush.shellsetname: Shell Voxel
commands: shv, shellvoxel
usage:
permission: voxelsniper.brush.shellvoxelThis will spawn a chunk of the block you specified and within the radius you specified.
name: Sign Overwrite Brush
commands: sio, signoverwriter
usage:
permission: voxelsniper.brush.signoverwritename: Snipe
commands: s, snipe
usage:
permission: voxelsniper.brush.snipeUsing the arrow will let you spawn a block at the point where you clicked, on the same level you clicked on. If you use the gunpowder it will spawn the block one layer above where you clicked.
name: Splatter Ball
commands: splatball, sb
usage:
permission: voxelsniper.brush.splatterball
This will create a ball of the block you chose and air, meaning the blocks are randomly put around the ball. The ball will be the size of the radius.
name: Splatter Disc
commands: svd, splatvoxeldisc, sd, splatdisc
usage:
permission: voxelsniper.brush.splatterdisc
This will create a disc of the block you chose and air, meaning the blocks are randomly put around the disc. The disc will be the size of the radius.
name: Splatter Overlay
commands: splatteroverlay, sover
usage:
permission: voxelsniper.brush.splatteroverlay
This works the same way as the /b overlay command, however the blocks are placed randomly within the radius you set rather than in a perfect shape.
name: Splatter Voxel
commands: splattervoxel, sv
usage:
permission: voxelsniper.brush.splattervoxelname: Spline
commands: sp, spline
usage: /b sp <sc|ss|render|clear>
permission: voxelsniper.brush.splinesc: Set control points.
ss: Set End points.
render: Render the spline.
clear: Remove all end and control points.
For this brush, the gunpowder is used to set points, while the arrow is used to remove them.
How to use:
The spline brush renders a curved line according to a bezier curve. See an example of a bezier curve below. While the example below is in 2D, the spline brush works in 3D.
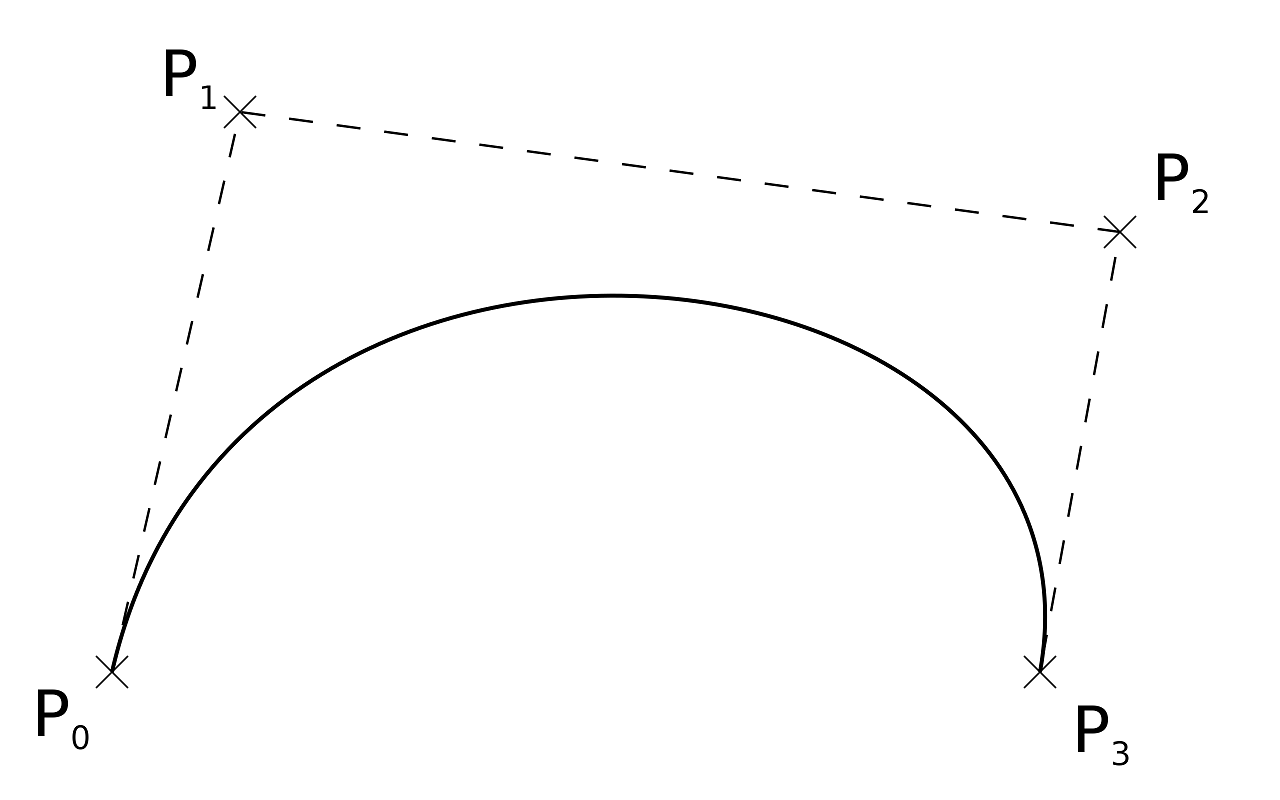
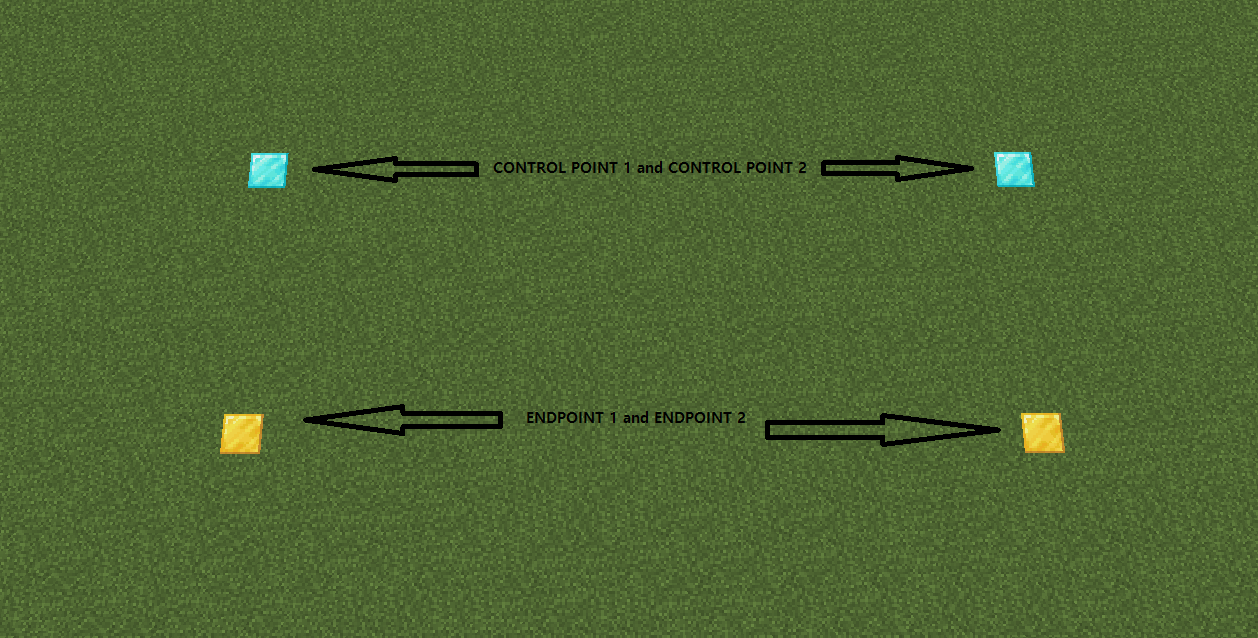
In the image above you can see p0, p1, p2 and p3. In VoxelSniper these points are split up in end points and control points. p0 and p4 correspond to the end points, while p1 and p2 correspond to the control points. If you take the image below you can see that the gold blocks are set as the end points, while the diamond blocks are set to the control points.
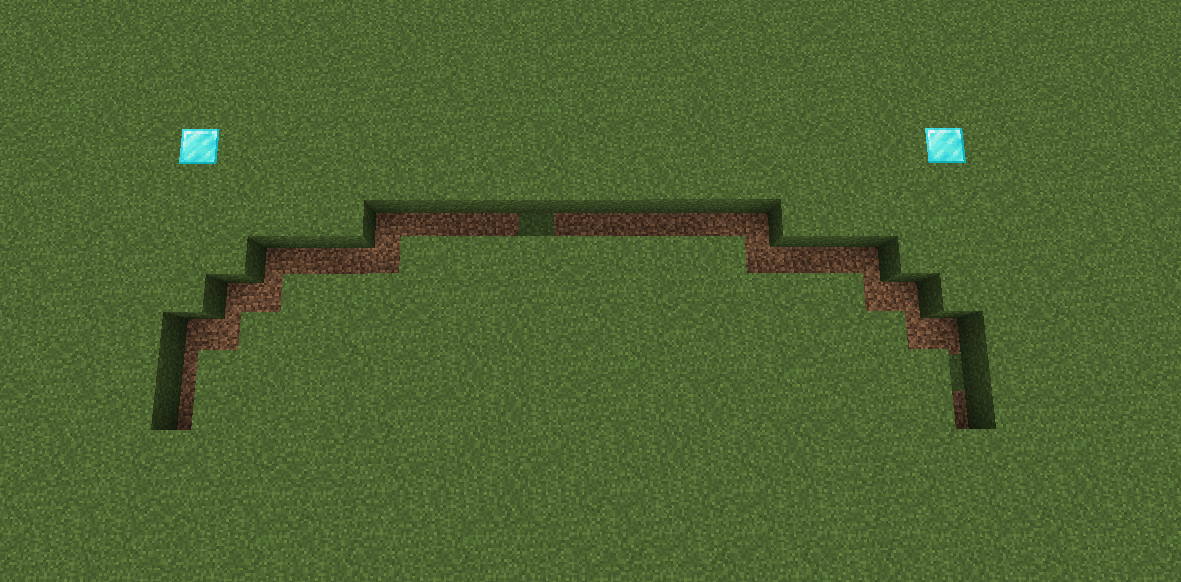
If you run the command /b spline render, then the spline will render like the image below.
Be aware:
The order of the points matters! If you swap the control or end points, then the spline will yield unexpected results!
name: Tree Snipe
commands: t, tree, treesnipe
usage:
permission: voxelsniper.brush.treesnipename: Triangle
commands: tri, triangle
usage:
permission: voxelsniper.brush.trianglename: Underlay (Reverse Overlay)
commands: under, underlay
usage:
permission: voxelsniper.brush.underlayname: VoltMeter
commands: voltmeter, volt
usage:
permission: voxelsniper.brush.voltmetername: Voxel
commands: voxel, v
usage:
permission: voxelsniper.brush.voxelname: Voxel Disc
commands: voxeldisc, vd
usage:
permission: voxelsniper.brush.voxeldiscname: Voxel Disc Face
commands: voxeldiscface, vdf
usage:
permission: voxelsniper.brush.voxeldiscfacename: Warp
commands: w, warp
usage:
permission: voxelsniper.brush.warpname: 2D Rotation
commands: rotation2dvertical, rot2v, rot2, rotation2d
usage:
permission: voxelsniper.brush.rot2dname: 3-Point Circle
commands: threepointcircle, tpc
usage:
permission: voxelsniper.brush.threepointcirclename: 3D Rotation
commands: rotation3d, rot3
usage:
permission: voxelsniper.brush.rot3d