Intro to the GUI Part 2
In this tutorial we will be adding a Main Menu module to the project we created in Part I. We will add the ToyAssets module as well, so that all of our Assets we create from this point on can be stored there. We will be looking closer at the relevant fields associated with GuiControls, as well as the overall workflow of the GUI in T2D MIT. Let's go ahead and look at that workflow now:
Canvas -> GuiControls -> GuiProfiles
In Part I of the tutorial, the Canvas was created when we launched AppCore. Then we called to the Canvas to push the dialog called ConsoleDialog, when pressing the key combination ctrl ~
Canvas.pushDialog(ConsoleDialog);
What happens under the hood is the GuiControls are loaded up and the GuiProfiles are referenced to set up the properties of the entire dialog. We'll cover all of this in greater detail as we progress through the tutorial. For now, a general understanding should suffice.
You may recall from Part I that our AppCore module called to load up the group 'gameBase':
ModuleDatabase.loadGroup("gameBase");
This loaded up our Console module, a part of the group 'gameBase'. We will be adding a MainMenu module soon, and also declare it as part of group 'gameBase'. This way when our application starts and AppCore loads up the group, our Console and MainMenu will both be included.
Our ToyAssets module is a seperate module entirely that can handle our assets we create for our application. For our upcoming MainMenu module to work it will depend on this ToyAssets module to be in place. Because our MainMenu module will need this ToyAssets module to work, we will declare this ToyAssets module as a dependancy when we set up our MainMenu's module.taml file. More on that later; for now, let's get this asset system in place:
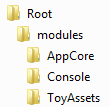
1 - Navigate to your 'Torque2D-2.0\modules' folder and copy the 'ToyAssets' folder. Place this in your 'Root\modules' folder.
Congratulations, you just installed a module just to handle all assets! This 'ToyAssets' folder contains all sorts of assets used by the T2D sandbox. For simplicity's sake, we will just keep all of this data. You can, of course, remove anything within the assets folder later if you won't be using it. I recommend keeping all of it for convenience during this and future tutorials. Now, open up the module.taml file within your new ToyAssets module so we can learn more about it:
<ModuleDefinition
    ModuleId="ToyAssets"
    VersionId="1"
    Description="A nice mix of assets used by all the toys."
    ToyCategoryIndex="0">
    <DeclaredAssets
	Path="assets"
	Extension="asset.taml"
	Recurse="true"/>
</ModuleDefinition>
We won't be changing any values here, because this template suits our needs. We are only looking here so that we can see the introduced child <DeclaredAssets>. This tells us where our assets will be stored. They will be stored in "assets" which is a subfolder of the 'ToyAssets' folder. Additionally, in order for an asset file to be loaded Extension="asset.taml" tells us the file requires the .asset.taml extension (picture.asset.taml for example).
Recurse="true" is important to us here as well. When set to "true" it allows us to create subfolders within 'ToyAssets\assets' that are able to be read by the Asset System. This way the 'ToyAssets\1\assets\images' folder can be used by our application.
Review: Your directory should now look like this:
With the ToyAssets module in place, we can now create our MainMenu module! By now, you should be familiar with the process of creating a basic main.cs and module.taml to get the module started. Let's run through this process, adding a folder to store our GUI Dialog files:
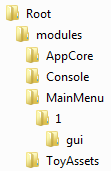
1 - Create a new 'Root\modules\MainMenu' folder. Go ahead and create a subfolder within and call it '1'.
2 - Within the '1' folder, create a new folder 'gui'. We will use this to store our Dialog files later on in Section III.
3 - Within the '1' folder, create a new module.taml file and define it as follows:
<ModuleDefinition
    ModuleId="MainMenu"
    VersionId="1"
    Dependencies="AppCore=1,ToyAssets=1,Console=1"
    Group="gameBase"
    Description="Main Menu."
    ScriptFile="main.cs"
    CreateFunction="create"
    DestroyFunction="destroy">
</ModuleDefinition>
Most important here is that we declared a new dependancy "ToyAssets" and declared this module part of the group "gameBase". Now when AppCore loads up the group "gameBase" it will also load up our new MainMenu module. We also add the Console module as a dependancy because, as you will see in the next section, we use one of the files from that module.
4 - Within the '1' folder, create a new main.cs file and define it as follows:
function MainMenu::create( %this )
{
    MainMenu.add( TamlRead("./gui/MenuDialog.gui.taml") );
    Canvas.pushDialog(MenuDialog);
}

function MainMenu::destroy( %this )
{
}
This is a very simple main.cs that we will build on moving forward. Here we declare that upon creation, our MainMenu module will load up the MenuDialog.gui.taml file. In the next line we call to the Canvas to actually put the dialog on the screen with Canvas.pushDialog(MenuDialog). We haven't actually created this Dialog file yet; this is our next step!
Review:
Your directory should now look like this:
Now we need the MenuDialog file that we just called for in the main.cs. This file will use the .gui.taml file extension, and depends on the guiProfiles.cs file that we created in Part I. Here are some key points to remember when creating a new .gui.taml file (I refer to these as 'Dialog files'):
- GuiControlProfiles (typically referred to as GuiProfiles or profiles) must be created and loaded up to use the new Dialog file you create. For organisational purposes you will often see all profiles together in a file called guiProfiles.cs.
- Any new Dialog file you create will enherit all attributes from the GuiProfiles that have been created in the guiProfiles.cs file.
Open your guiProfiles.cs file. It is located in your 'Root\modules\Console\1\gui' folder we created in Part I. Go ahead and browse this file a bit to get familiar with its contents. You will see all of the default GUI Profiles declared here that you can use in your new Dialog file. Around line 340 you should see the GuiButtonProfile and then the BlueButtonProfile. These basic profiles are created here in advance so that later we can specify that we want one of our GUI elements to use this proile. Notice that the default image asset is declared here as well, so any button we create later that uses this profile will use this image file. Close the file, we won't be altering it. Let's make the MenuDialog.gui.taml file:
1 - Within the 'Root\modules\MainMenu\1\gui' folder, create a new MenuDialog.gui.taml file and define it as follows:
<GuiSpriteCtrl
    Name="MenuDialog"
    Profile="GuiToolboxProfile"
    HorizSizing="relative"
    VertSizing="relative"
    Position="0 0"
    Extent="1024 768"
    MinExtent="320 320"
    Visible="1"
    Image="@asset=ToyAssets:jungleSky">
</GuiSpriteCtrl>
This file won't do much just yet like this. I would like to point out some important things that are going on here first before adding more. Notice we begin with <GuiSpriteCtrl and then set up our fields, ending the whole 'block' with >. Next we have a closing tag </GuiSpriteCtrl>. Both of these together create a parent GuiControl that acts as a main 'body' in which any child GuiControls can be found. Example: < child gui control >
-
<GuiSpriteCtrldeclares right away we want to use a GuiSpriteCtrl as our type of Gui Control. -
Profile="GuiToolboxProfile"declares that we want to use the GuiToolboxProfile from the guiProfiles.cs file. Always remember to declare a profile! -
Extent="1024 768"declares that we are going to create a space for our new GUI Control that extends 1024px to the right and 768px down. For parent controls this field is basically ignored as a parent control fills the entire Canvas, regardless of size.
We also added Image="@asset=ToyAssets:jungleSky" so the space will be filled with an image. This is using the Asset System we created earlier. Memorize this way of declaring assets, from this point forward you can store assets in the ToyAssets module and access them this way!
2 - Within the new MenuDialog.gui.taml file define a new child GuiControl as follows. Here I include the entire contents of the file, adding 2 new buttons between the <GuiSpriteCtrl> tags we just created:
<GuiSpriteCtrl
    Name="MenuDialog"
    Profile="GuiToolboxProfile"
    HorizSizing="relative"
    VertSizing="relative"
    Position="0 0"
    Extent="1024 768"
    MinExtent="320 320"
    Visible="1"
    Image="@asset=ToyAssets:jungleSky">

    <!-- New Game-->
    <GuiButtonCtrl
        Name="NewGameButton"
        Profile="BlueButtonProfile"
        Text="New Game"
        ButtonType="PushButton"
        canSaveDynamicFields="0"
        isContainer="0"
        HorizSizing="relative"
        VertSizing="relative"
        Position="412 369"
        Extent="200 30"
        MinExtent="100 15"
        canSave="1"
        Visible="1"
        Active="1"
        hovertime="1000"
        groupNum="-1"
        useMouseEvents="1" />

    <!-- Quit Game-->
    <GuiButtonCtrl
        Name="QuitButton"
        Profile="BlueButtonProfile"
        Text="Quit Game"
        ButtonType="PushButton"
        canSaveDynamicFields="0"
        isContainer="0"
        HorizSizing="relative"
        VertSizing="relative"
        Position="412 399"
        Extent="200 30"
        MinExtent="100 15"
        canSave="1"
        Visible="1"
        Active="1"
        hovertime="1000"
        groupNum="-1"
        useMouseEvents="1" />
</GuiSpriteCtrl>
Notice we created 2 new GUI Controls using the <GuiButtonCtrl/> tag. Let's look at the first button, the New Game Button.
-
Name="NewGameButton"is important because we will use this named field in any scripts that use the button. - We declared the type of Profile to use here:
Profile="BlueButtonProfile". - We declare where to place the button (within the bounds of the 1024x768 space of <GuiSpriteCtrl) with
Position="412 399". -
Extent="200 30"tells us the button extends to the right 200px and down 30px from our Position to create the button.
This should all be starting to make more sense by now, but there is one thing that needs to be clarified here. The guiProfiles.cs stores the profiles for the GuiControls to use, but where do the actual GuiControls themselves come from? The GuiControl class is the root class for all the GuiControls in the system. Here's the class reference page:
http://garagegames.github.io/Torque2D/TorqueScriptDocs/html/classGuiControl.html
Review:
Your directory should look the same, we only added the MenuDialog.gui.taml file.
If we now run our application, we will get a nice background image with our 2 new buttons! This is all very exciting, although our buttons won't be of much use if they don't actually perform any actions. Luckily, this is easy to fix so let's open up our MainMenu module's main.cs and add the commands for the buttons.
1 - Within the 'Root\modules\MainMenu\1' folder, open the main.cs file and add the new button commands. Here are the contents of the modified file:
function MainMenu::create( %this )
{
    MainMenu.add( TamlRead("./gui/MenuDialog.gui.taml") );
    Canvas.pushDialog(MenuDialog);

    // Adding another Dialog file.
    MainMenu.add( TamlRead("./gui/OptionsDialog.gui.taml") );
}

function MainMenu::destroy( %this )
{
}

// Adding command for NewGameButton.
function NewGameButton::onClick(%this)
{
    Canvas.popDialog(MenuDialog);
    Canvas.pushDialog(OptionsDialog);
}

// Adding command for QuitButton.
function QuitButton::onClick(%this)
{
    quit();
}
Look at the new function we've created for the NewGameButton. It declares that when the mouse left button is clicked, do this command: function NewGameButton::onClick(%this). The commands here are Canvas.pushDialog(OptionsDialog); and Canvas.popDialog(MenuDialog);. This tells the Canvas to show the OptionsDialog (which we are about to add) and remove the MenuDialog that we were just looking at. The QuitButton exits the application. Now we should make the new OptionsDialog that we just called to show up.
2 - Within the 'Root\modules\MainMenu\1\gui' folder, create a new OptionsDialog.gui.taml file and define it as follows:
<GuiSpriteCtrl
    Name="OptionsDialog"
    Profile="GuiToolboxProfile"
    HorizSizing="relative"
    VertSizing="relative"
    Position="0 0"
    Extent="1024 768"
    MinExtent="320 320"
    Visible="1"
    Image="@asset=ToyAssets:blueGradient">

    <!-- Start Game-->
    <GuiButtonCtrl
	Name="StartGameButton"
        Profile="BlueButtonProfile"
	Text="Start Game"
	ButtonType="PushButton"
	canSaveDynamicFields="0"
        isContainer="0"
        HorizSizing="relative"
        VertSizing="relative"
	Position="412 369"
	Extent="200 30"
	MinExtent="100 15"
        canSave="1"
        Visible="1"
        Active="1"
        hovertime="1000"
        groupNum="-1"
        useMouseEvents="1" />

    <!-- Main Menu-->
    <GuiButtonCtrl
	Name="MainMenuButton"
        Profile="BlueButtonProfile"
	Text="Main Menu"
	ButtonType="PushButton"
	canSaveDynamicFields="0"
        isContainer="0"
        HorizSizing="relative"
        VertSizing="relative"
	Position="412 399"
	Extent="200 30"
	MinExtent="100 15"
        canSave="1"
        Visible="1"
        Active="1"
        hovertime="1000"
        groupNum="-1"
        useMouseEvents="1" />

</GuiSpriteCtrl>
This should look very familiar. In fact it is just a modified version of the MenuDialog we already created. I just copied it and changed the relevant fields for the new buttons. We changed the image as a visual indicator, and renamed the buttons. Equipped with our new OptionsDialog file, we can return to our main.cs and add in the commands for the new buttons.
3 - Within the 'Root\modules\MainMenu\1' folder, open the main.cs file and add the new button commands. Here are the contents of the modified file:
function MainMenu::create( %this )
{
    MainMenu.add( TamlRead("./gui/MenuDialog.gui.taml") );
    Canvas.pushDialog(MenuDialog);

    // Adding another Dialog file.
    MainMenu.add( TamlRead("./gui/OptionsDialog.gui.taml") );
}

function MainMenu::destroy( %this )
{
}

// Adding command for NewGameButton.
function NewGameButton::onClick(%this)
{
    Canvas.popDialog(MenuDialog);
    Canvas.pushDialog(OptionsDialog);
}

// Adding command for QuitButton.
function QuitButton::onClick(%this)
{
    quit();
}

// Adding command for StartGameButton.
function StartGameButton::onClick(%this)
{
    // This group doesn't exist, just here for example.
    //We could load up a group this way to start the game.
    ModuleDatabase.loadGroup("gameStartGroup");
    Canvas.popDialog(OptionsDialog);
}

// Adding command for MainMenuButton.
function MainMenuButton::onClick(%this)
{
    Canvas.popDialog(OptionsDialog);
    Canvas.pushDialog(MenuDialog);
}
The point of all of this is to demonstrate how easy it is to push or pop dialogs to navigate from menu to menu. Notice we have not created any Scene or SceneWindow at this time. All of this is handled directly by the Canvas. If we were wanting to be more creative with our MainMenu module, adding more graphics and an actual scene in the background we would need to create a SceneWindow and Scene. Using only a background image, you can just declare it in the GUI Control's .gui.taml file.
Review:
Your directory should look the same, we only added the OptionsDialog.gui.taml file and added commands to our main.cs file.
This concludes Part II of the Intro to the GUI Tutorial! Launching your application now, you can see that clicking each button performs the desired result. Clicking the "New Game" button will bring us to our options menu, and clicking the "Main Menu" button from the new menu will return us to the first menu. "Quit Game" will exit the application, and "Start Game" will launch whatever we desire. In the example, it's set up to launch the game group "gameStartGroup" which doesn't exist.
This should take you one step closer to GUI mastery! You should now have a basic understanding of the basic components, workflow, and steps involved with creating functional GUI elements. Pat yourself on the back, you will now find all of the GuiControls are fairly straightforward to use. As usual, we only needed to gain "A firm grasp of the obvious."